

General
Replica Set
What Is a Replica Set?
A Replica Set is a high-availability architecture that keeps the same dataset synchronized across multiple MongoDB servers. A typical Replica Set consists of one Primary node and one or more Secondary nodes.
The Primary node is responsible for handling write operations. Secondary nodes continuously monitor changes on the Primary through the oplog and apply those changes locally. This process ensures that data remains synchronized and up to date across all Replica Set members.
If the Primary node becomes unavailable, an eligible Secondary node can automatically be elected as the new Primary. This process is known as an election. With a properly designed Replica Set, write operations can continue without requiring manual intervention.
A Replica Set deployment should ideally contain at least three nodes. Although MongoDB allows Replica Sets with only two nodes, such configurations are not sufficient for true high availability. If the Primary node fails, the remaining node cannot achieve a majority vote. Without a majority, the surviving Secondary node cannot automatically become the new Primary, causing write operations to stop.
The primary goals of a Replica Set are data redundancy, high availability, and automatic failover. However, Replica Sets are not a replacement for backups. Any deletion, update, or accidental data modification performed on the Primary node is replicated to Secondary nodes as well. Since Replica Sets do not provide point-in-time recovery capabilities, they should always be combined with a proper backup strategy.
Why Use a Replica Set?
When MongoDB runs on a single server, hardware failures, operating system issues, disk problems, or MongoDB service interruptions can make the database unavailable to applications.
With a Replica Set, data is distributed across multiple nodes. As a result, the failure of a single server does not necessarily bring down the entire system. When the required conditions are met, a new Primary node is automatically elected and database operations can continue.
Replica Sets are commonly used for the following purposes:
1. Ensuring High Availability
If the Primary node becomes unavailable, Replica Set members automatically hold an election and select an appropriate Secondary node as the new Primary.
2. Reducing the Risk of Data Loss
Data is not stored on a single server. Instead, it is replicated to Secondary nodes, ensuring that copies of the data remain available even if the Primary node is lost.
3. Performing Maintenance More Safely
Server updates, restarts, operating system maintenance, and MongoDB version upgrades can be performed sequentially across nodes. This allows maintenance activities to be completed without shutting down the entire environment.
4. Distributing Read Workloads
By default, both read and write operations are handled by the Primary node. However, applications can use read preference settings to direct specific read operations to Secondary nodes.
Read preference determines how client applications distribute read requests among Replica Set members.
5. Building Disaster Recovery Scenarios
Secondary nodes can be deployed in different geographic locations to improve resilience against data center outages.
For example, the Primary node may be located in Ankara while a Secondary node is located in Istanbul. This approach provides significant advantages for disaster recovery planning.
How Does a Replica Set Work?
How Does a Replica Set Work?
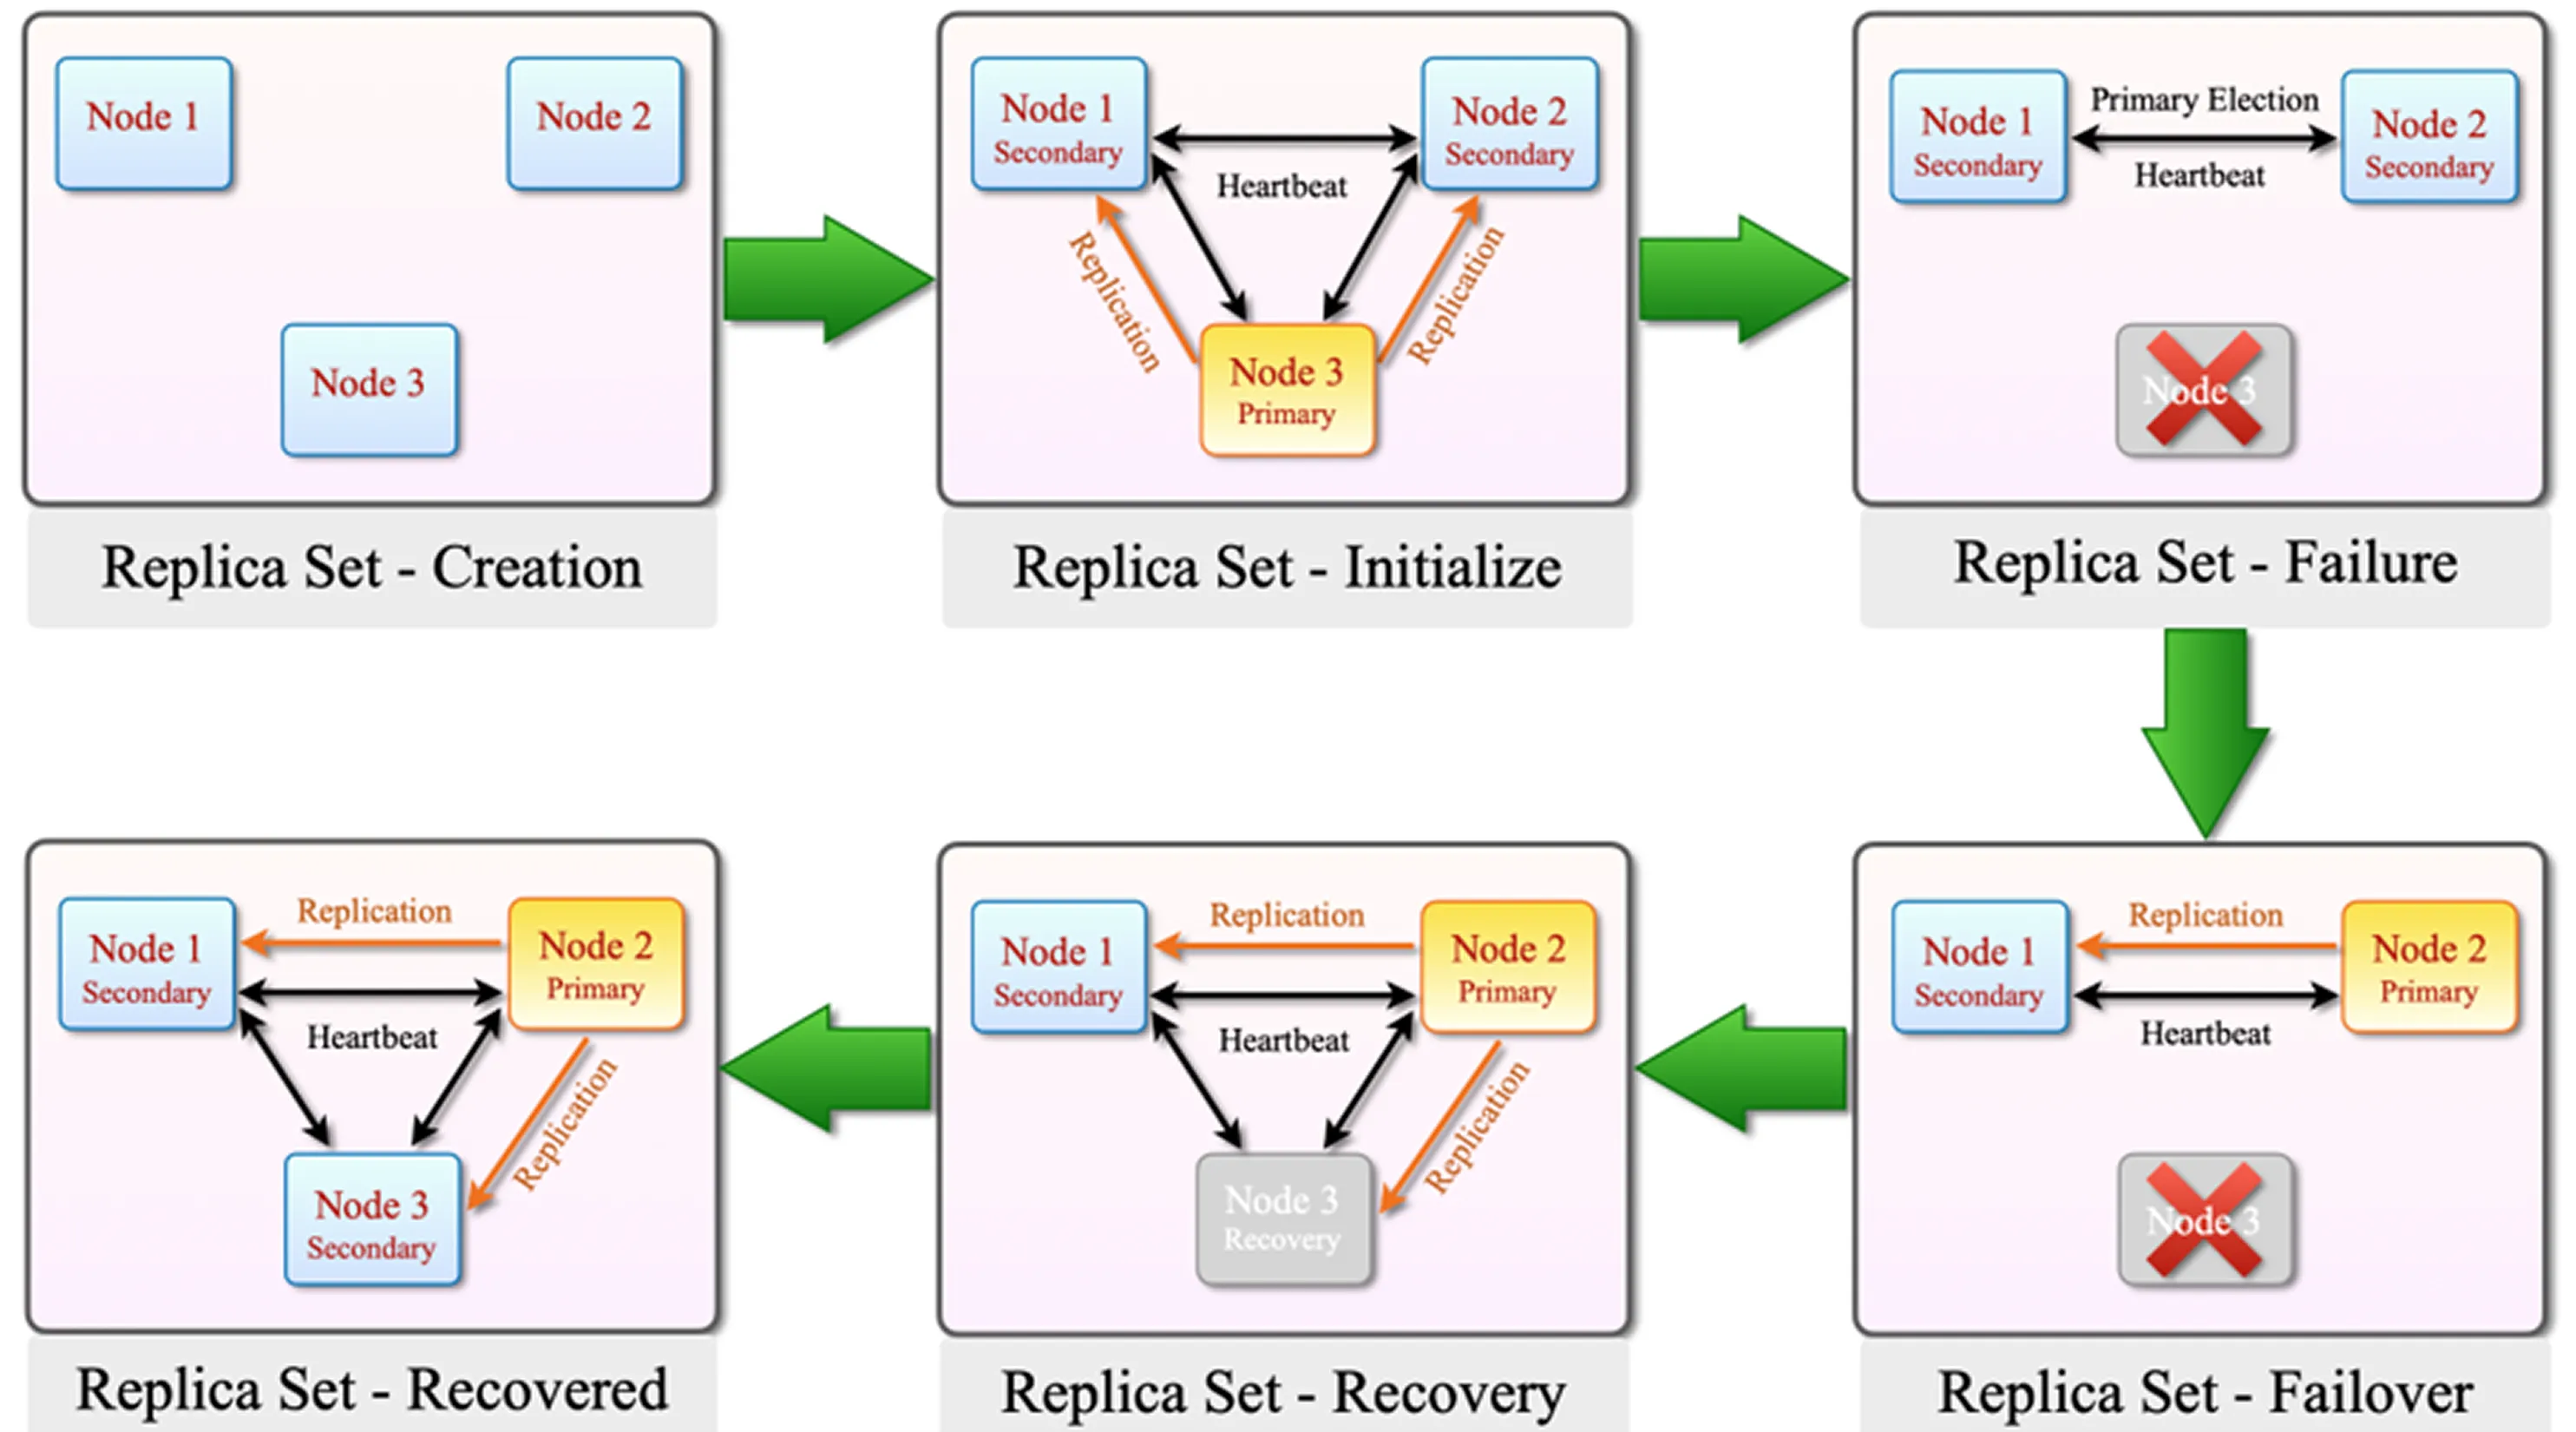
The lifecycle of a MongoDB Replica Set consists of initialization, election, failover, recovery, and synchronization processes. Together, these mechanisms provide high availability and automatic failover.
1. Replica Set – Creation
Initially, three MongoDB nodes are prepared to participate in the Replica Set.
Although a Replica Set can be started with only two nodes, such a configuration is not suitable for high availability because a majority cannot be maintained during failure scenarios.
2. Replica Set – Initialize
When the Replica Set is initialized, the nodes begin communicating through the heartbeat mechanism. Heartbeats allow members to continuously monitor whether other nodes are online and responsive.
After initialization, an election takes place and one node is selected as the Primary. The remaining members operate as Secondary nodes.
From this point forward:
Write operations are processed by the Primary node.
The Primary records all changes in the oplog.
Secondary nodes continuously monitor the oplog and apply changes locally.
3. Replica Set – Failure
The Primary node (Node 3) becomes unavailable due to a failure or connectivity issue.
Using the heartbeat mechanism, Replica Set members detect that Node 3 is no longer responding.
Since the Primary is unavailable, a new election must be initiated.
4. Replica Set – Failover
After Node 3 becomes unavailable, an election is held among the remaining eligible members.
This process is known as failover.
Because the previous Primary is no longer reachable, an eligible Secondary node is automatically promoted to become the new Primary. As a result, database operations continue through the newly elected Primary rather than causing a complete outage.
5. Replica Set – Recovery
When the failed Node 3 comes back online, it does not immediately become the Primary again.
Instead, it rejoins the Replica Set and begins synchronizing missing data.
The node retrieves any missing oplog entries from the current Primary or another suitable sync source and applies them locally.
This process is commonly referred to as recovery or synchronization.
During this stage, Node 3 works to catch up with the rest of the Replica Set and return to a healthy state.
6. Replica Set – Recovered
Once Node 3 has successfully applied all missing replication records, it resumes operation as a healthy Secondary node.
The current Primary continues serving requests normally, and the recovered node remains synchronized with the rest of the Replica Set.
A returning Primary does not automatically reclaim the Primary role.
Summary
In a MongoDB Replica Set architecture, nodes continuously monitor each other's health through heartbeat messages.
If the Primary becomes unavailable, the remaining eligible members automatically conduct an election and select a new Primary.
When the failed node returns, it synchronizes missing data and typically rejoins the Replica Set as a Secondary member. This architecture provides high availability and automatic failover.
How Is Data Replicated to Replica Servers?
In MongoDB, the oplog (operations log) is a special log structure that records data changes occurring within a Replica Set.
Operations such as inserts, updates, and deletes performed on the Primary node are written to the oplog. Secondary nodes continuously monitor these oplog entries and apply the same operations to their own datasets.
In other words, the oplog mechanism forms the foundation of MongoDB Replica Set replication.
Where Is the Oplog Stored?
Oplog records are stored in the oplog.rs collection located within the local database on each Replica Set member.
The following command can be used to view oplog records:
To display the most recent oplog entries:
How Does the Oplog Work?
When an application sends a write operation to the Primary node, MongoDB follows a specific replication workflow.
The Primary applies the change to its local dataset and simultaneously records the operation in the oplog.
Secondary nodes continuously read the oplog and apply those operations locally to remain synchronized with the Primary.
The replication process can be summarized as follows:
The application sends an insert, update, or delete operation to the Primary node.
The Primary node applies the operation to its local dataset.
The operation is written to the oplog.
Secondary nodes read the oplog entries.
Secondary nodes apply the same operations to their local datasets.
All Replica Set members remain synchronized.
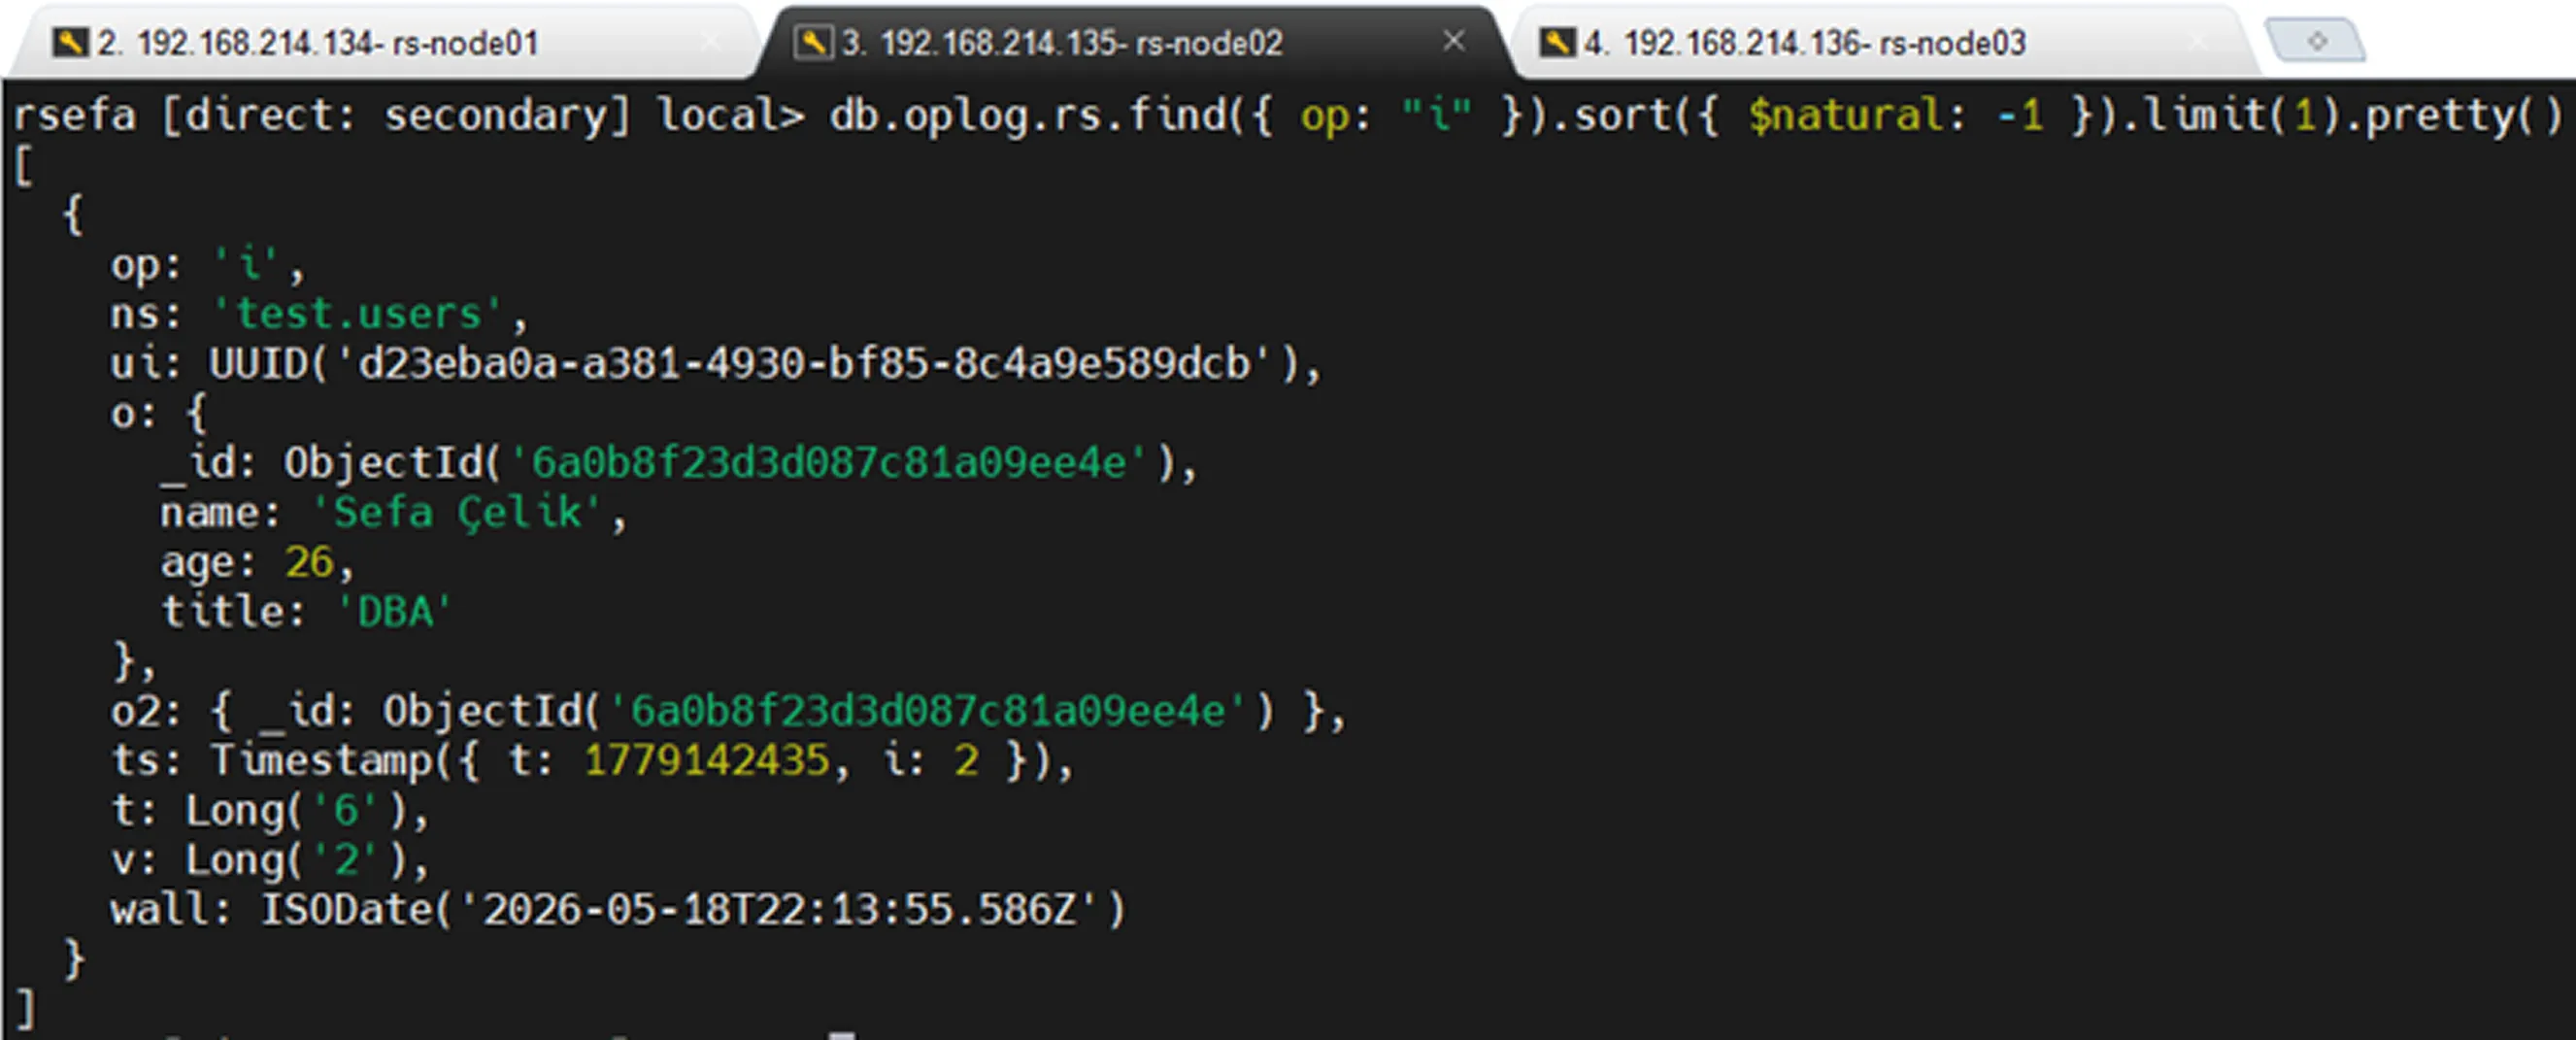
What Fields Exist in Oplog Records?
Oplog records typically contain the following fields:
Field | Description |
|---|---|
ts | Timestamp of the operation |
op | Operation type |
ns | Namespace where the operation occurred ( |
o | Operation content |
o2 | Primarily used in update operations to identify the modified document |
Common values found in the op field include:
Value | Meaning |
|---|---|
i | Insert |
u | Update |
d | Delete |
c | Command |
n | No-op |
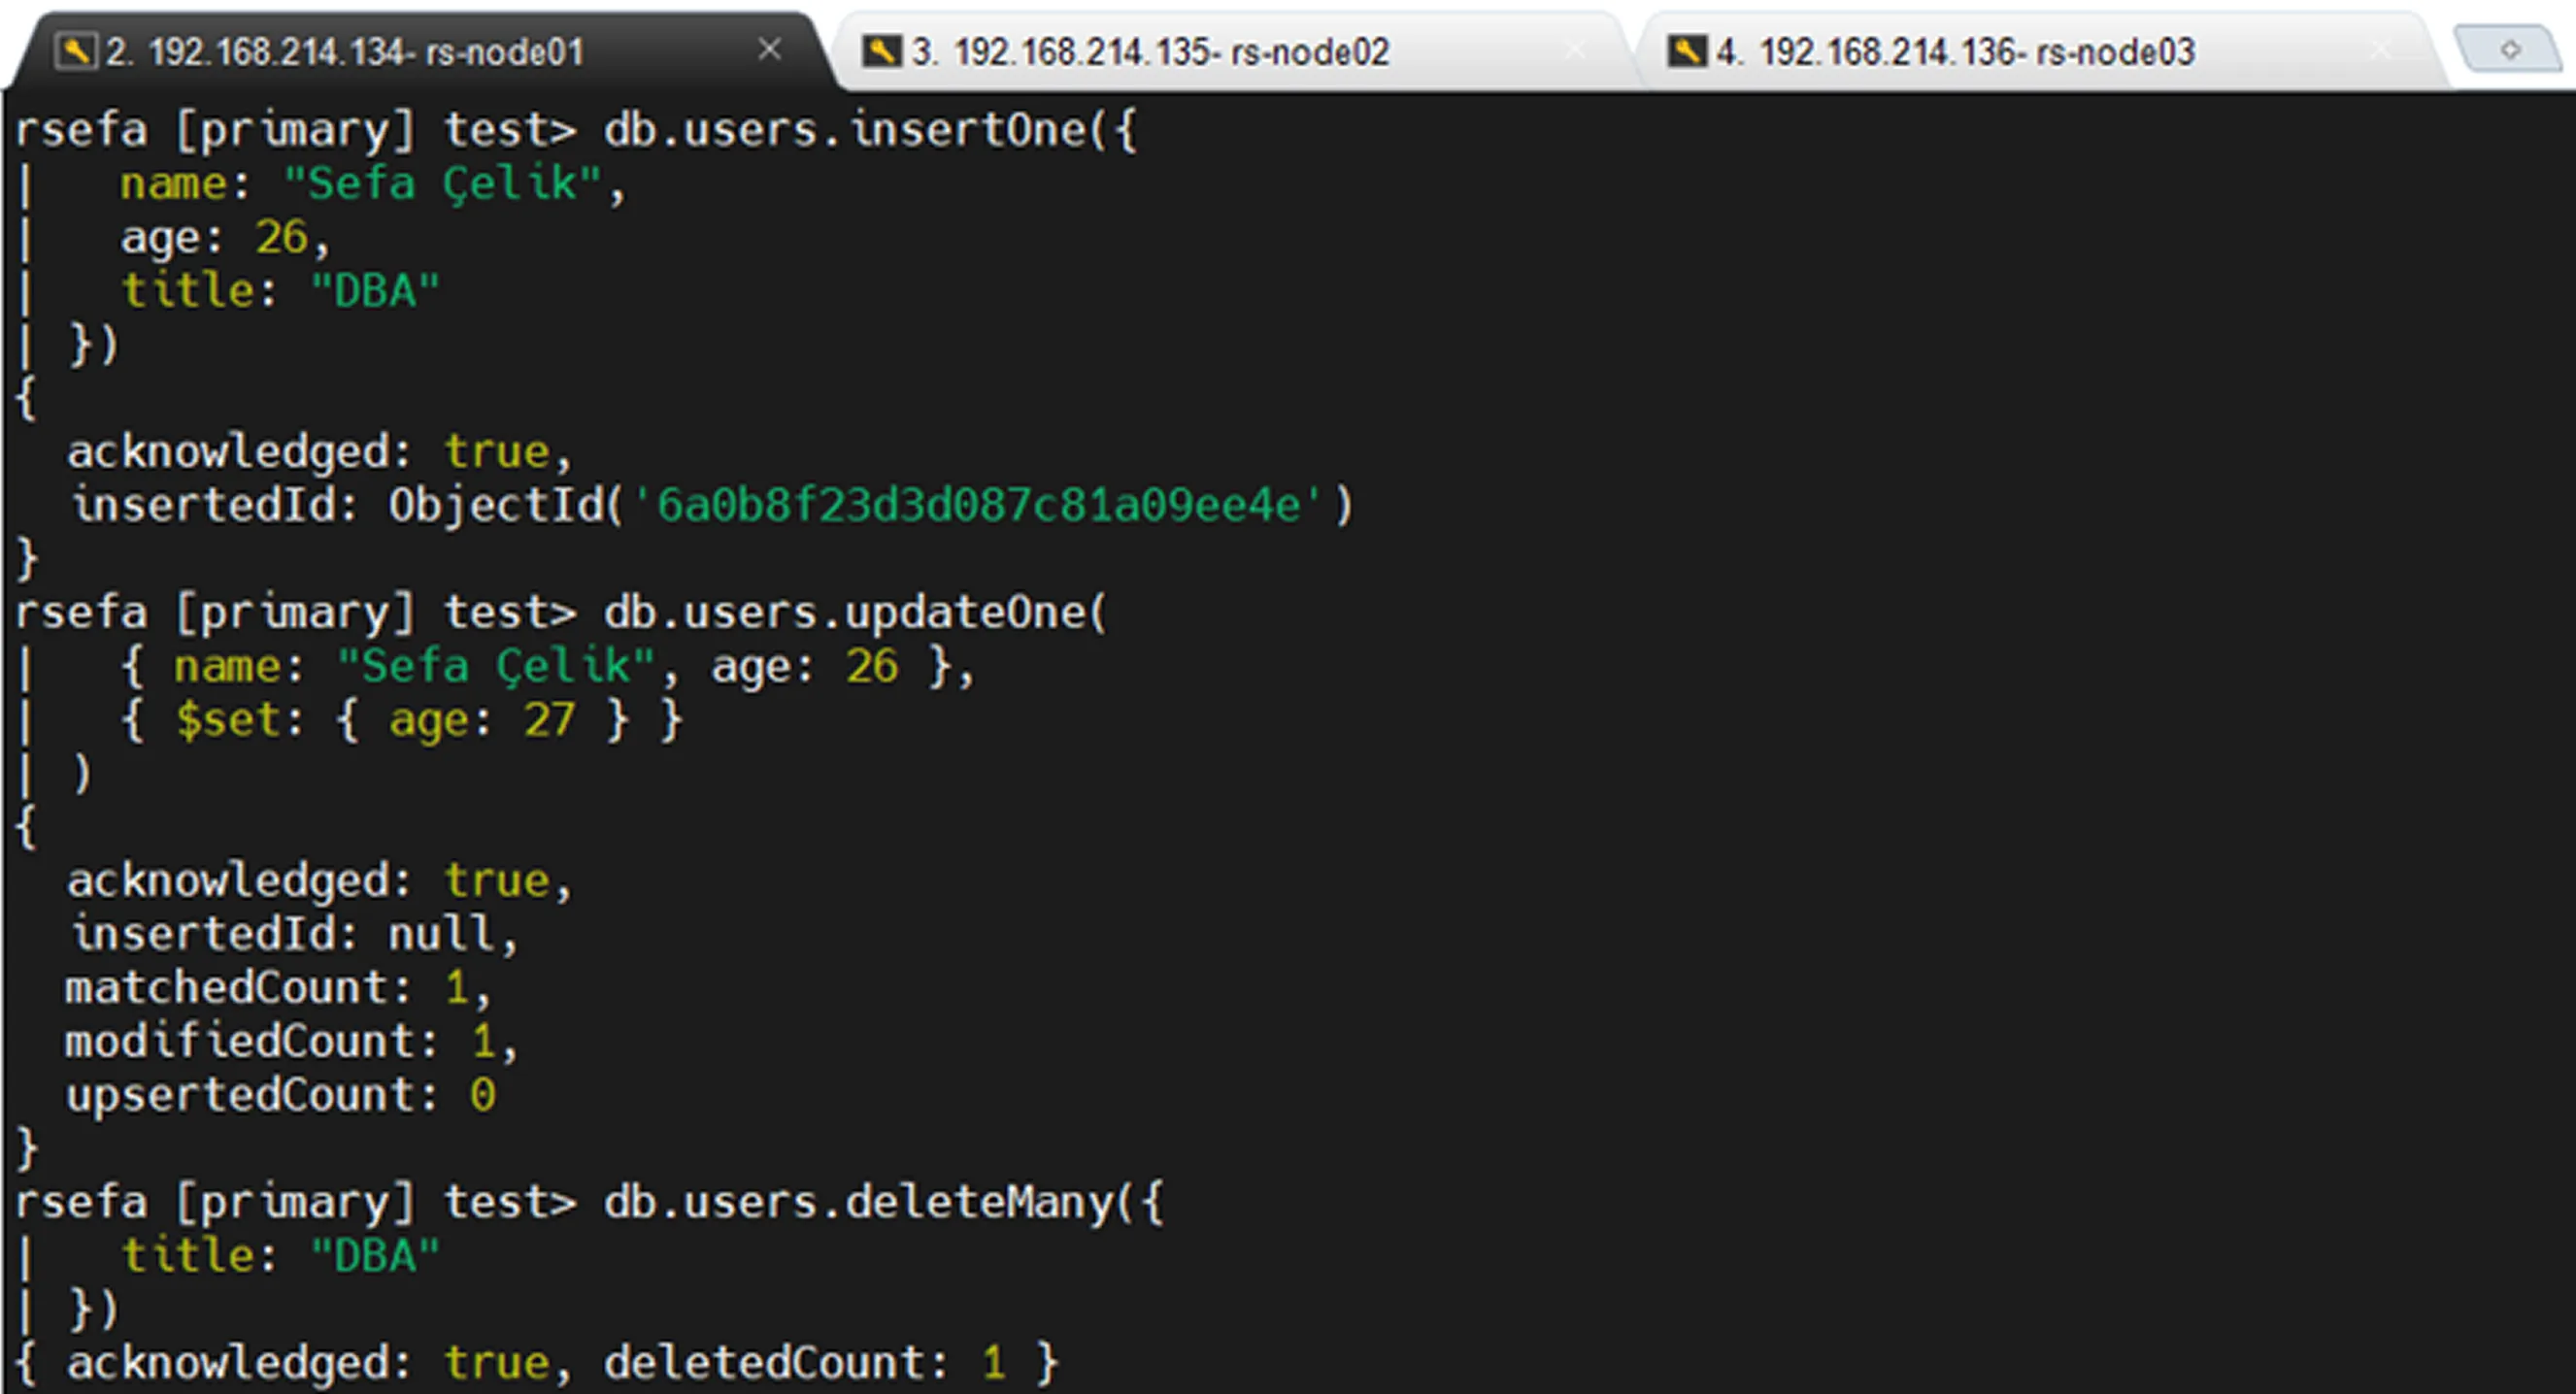
Testing Oplog Records
Sample insert, update, and delete operations can be executed to observe oplog entries.
Insert Operation
Update Operation
Delete Operation
use local
Viewing Only Insert Records
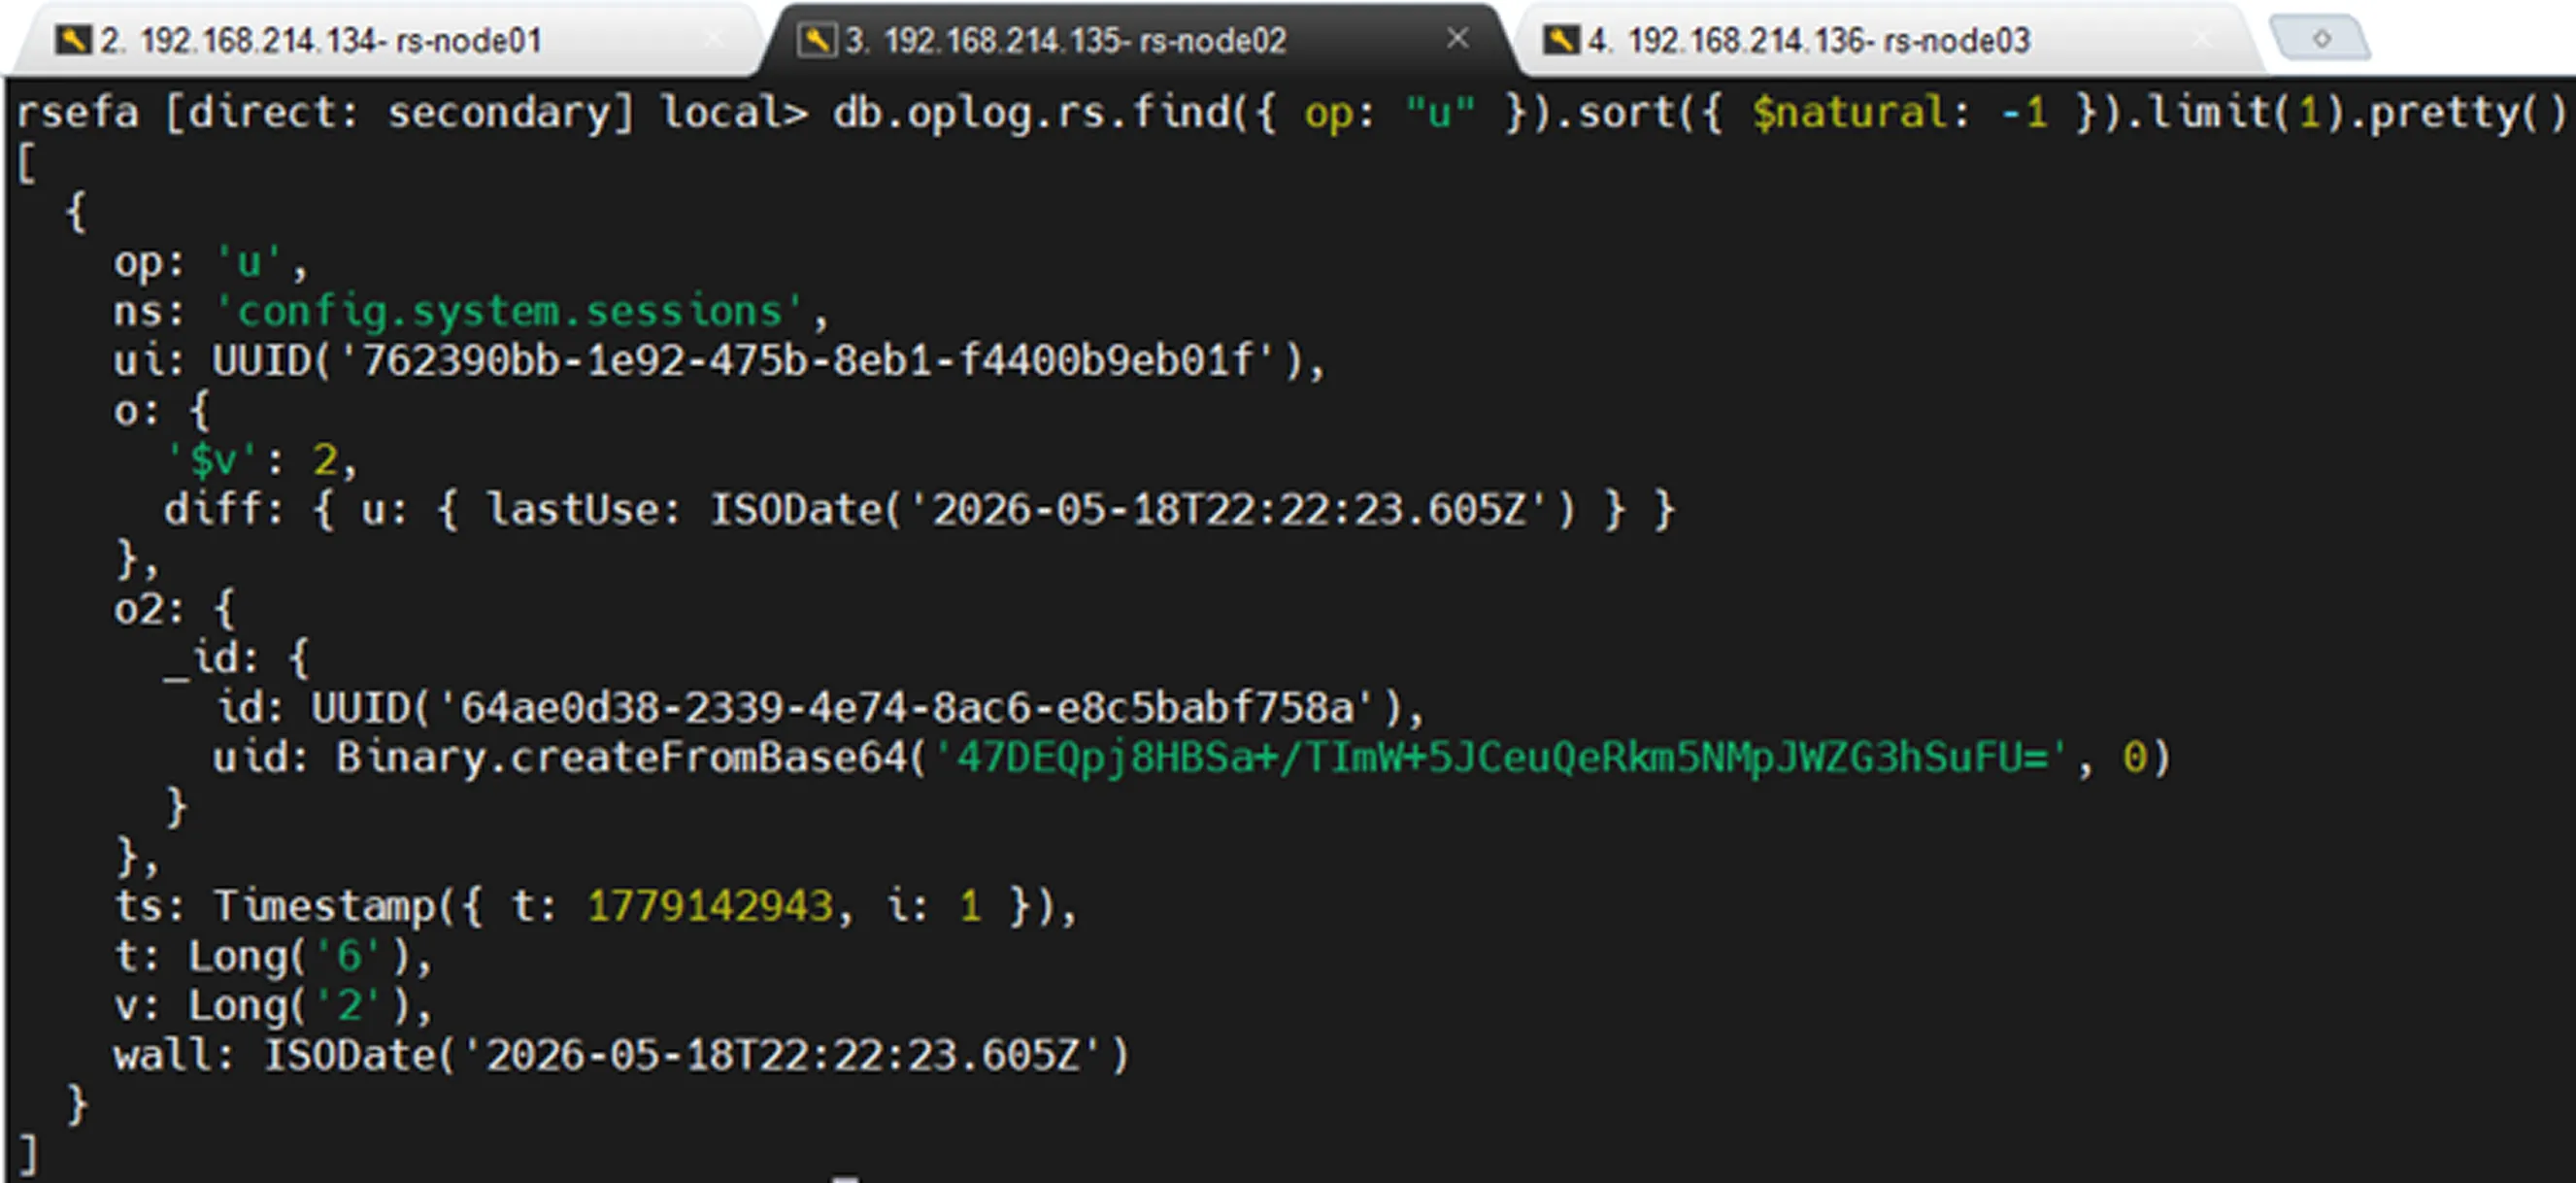
Viewing Only Update Records
Viewing Only Delete Records
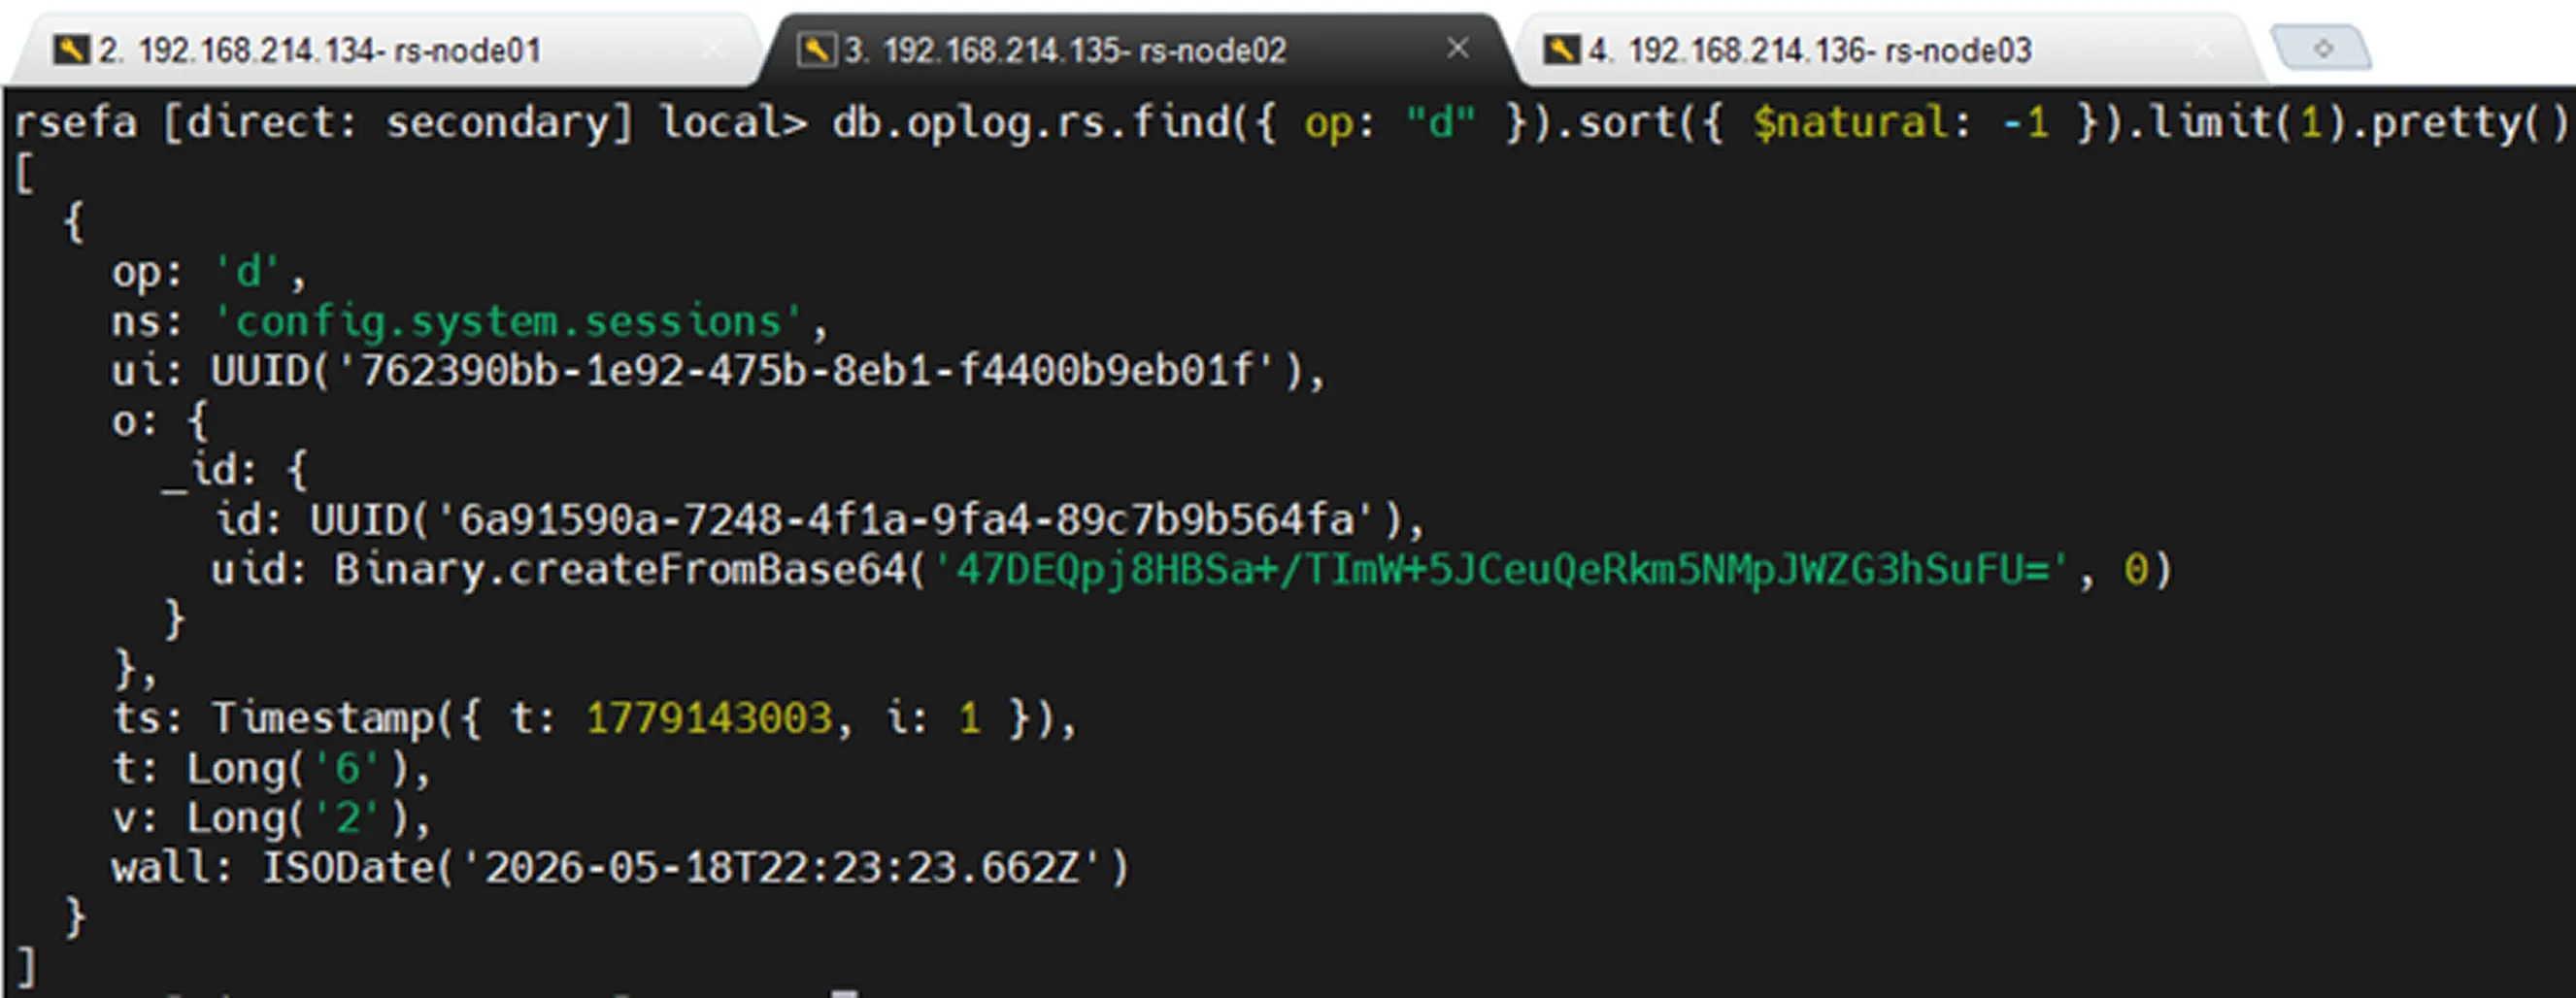
Oplog Size and Retention
The oplog is not an infinitely growing structure. It operates as a capped collection, meaning it has a fixed size. As the allocated space becomes full, the oldest oplog records are automatically removed and replaced with new entries.
For this reason, oplog size is extremely important. If a Secondary node remains offline for an extended period and older oplog entries on the Primary are removed during that time, the Secondary node can no longer continue replication from where it left off. In such cases, the Secondary node must perform a new initial sync.
To view oplog size and replication status:
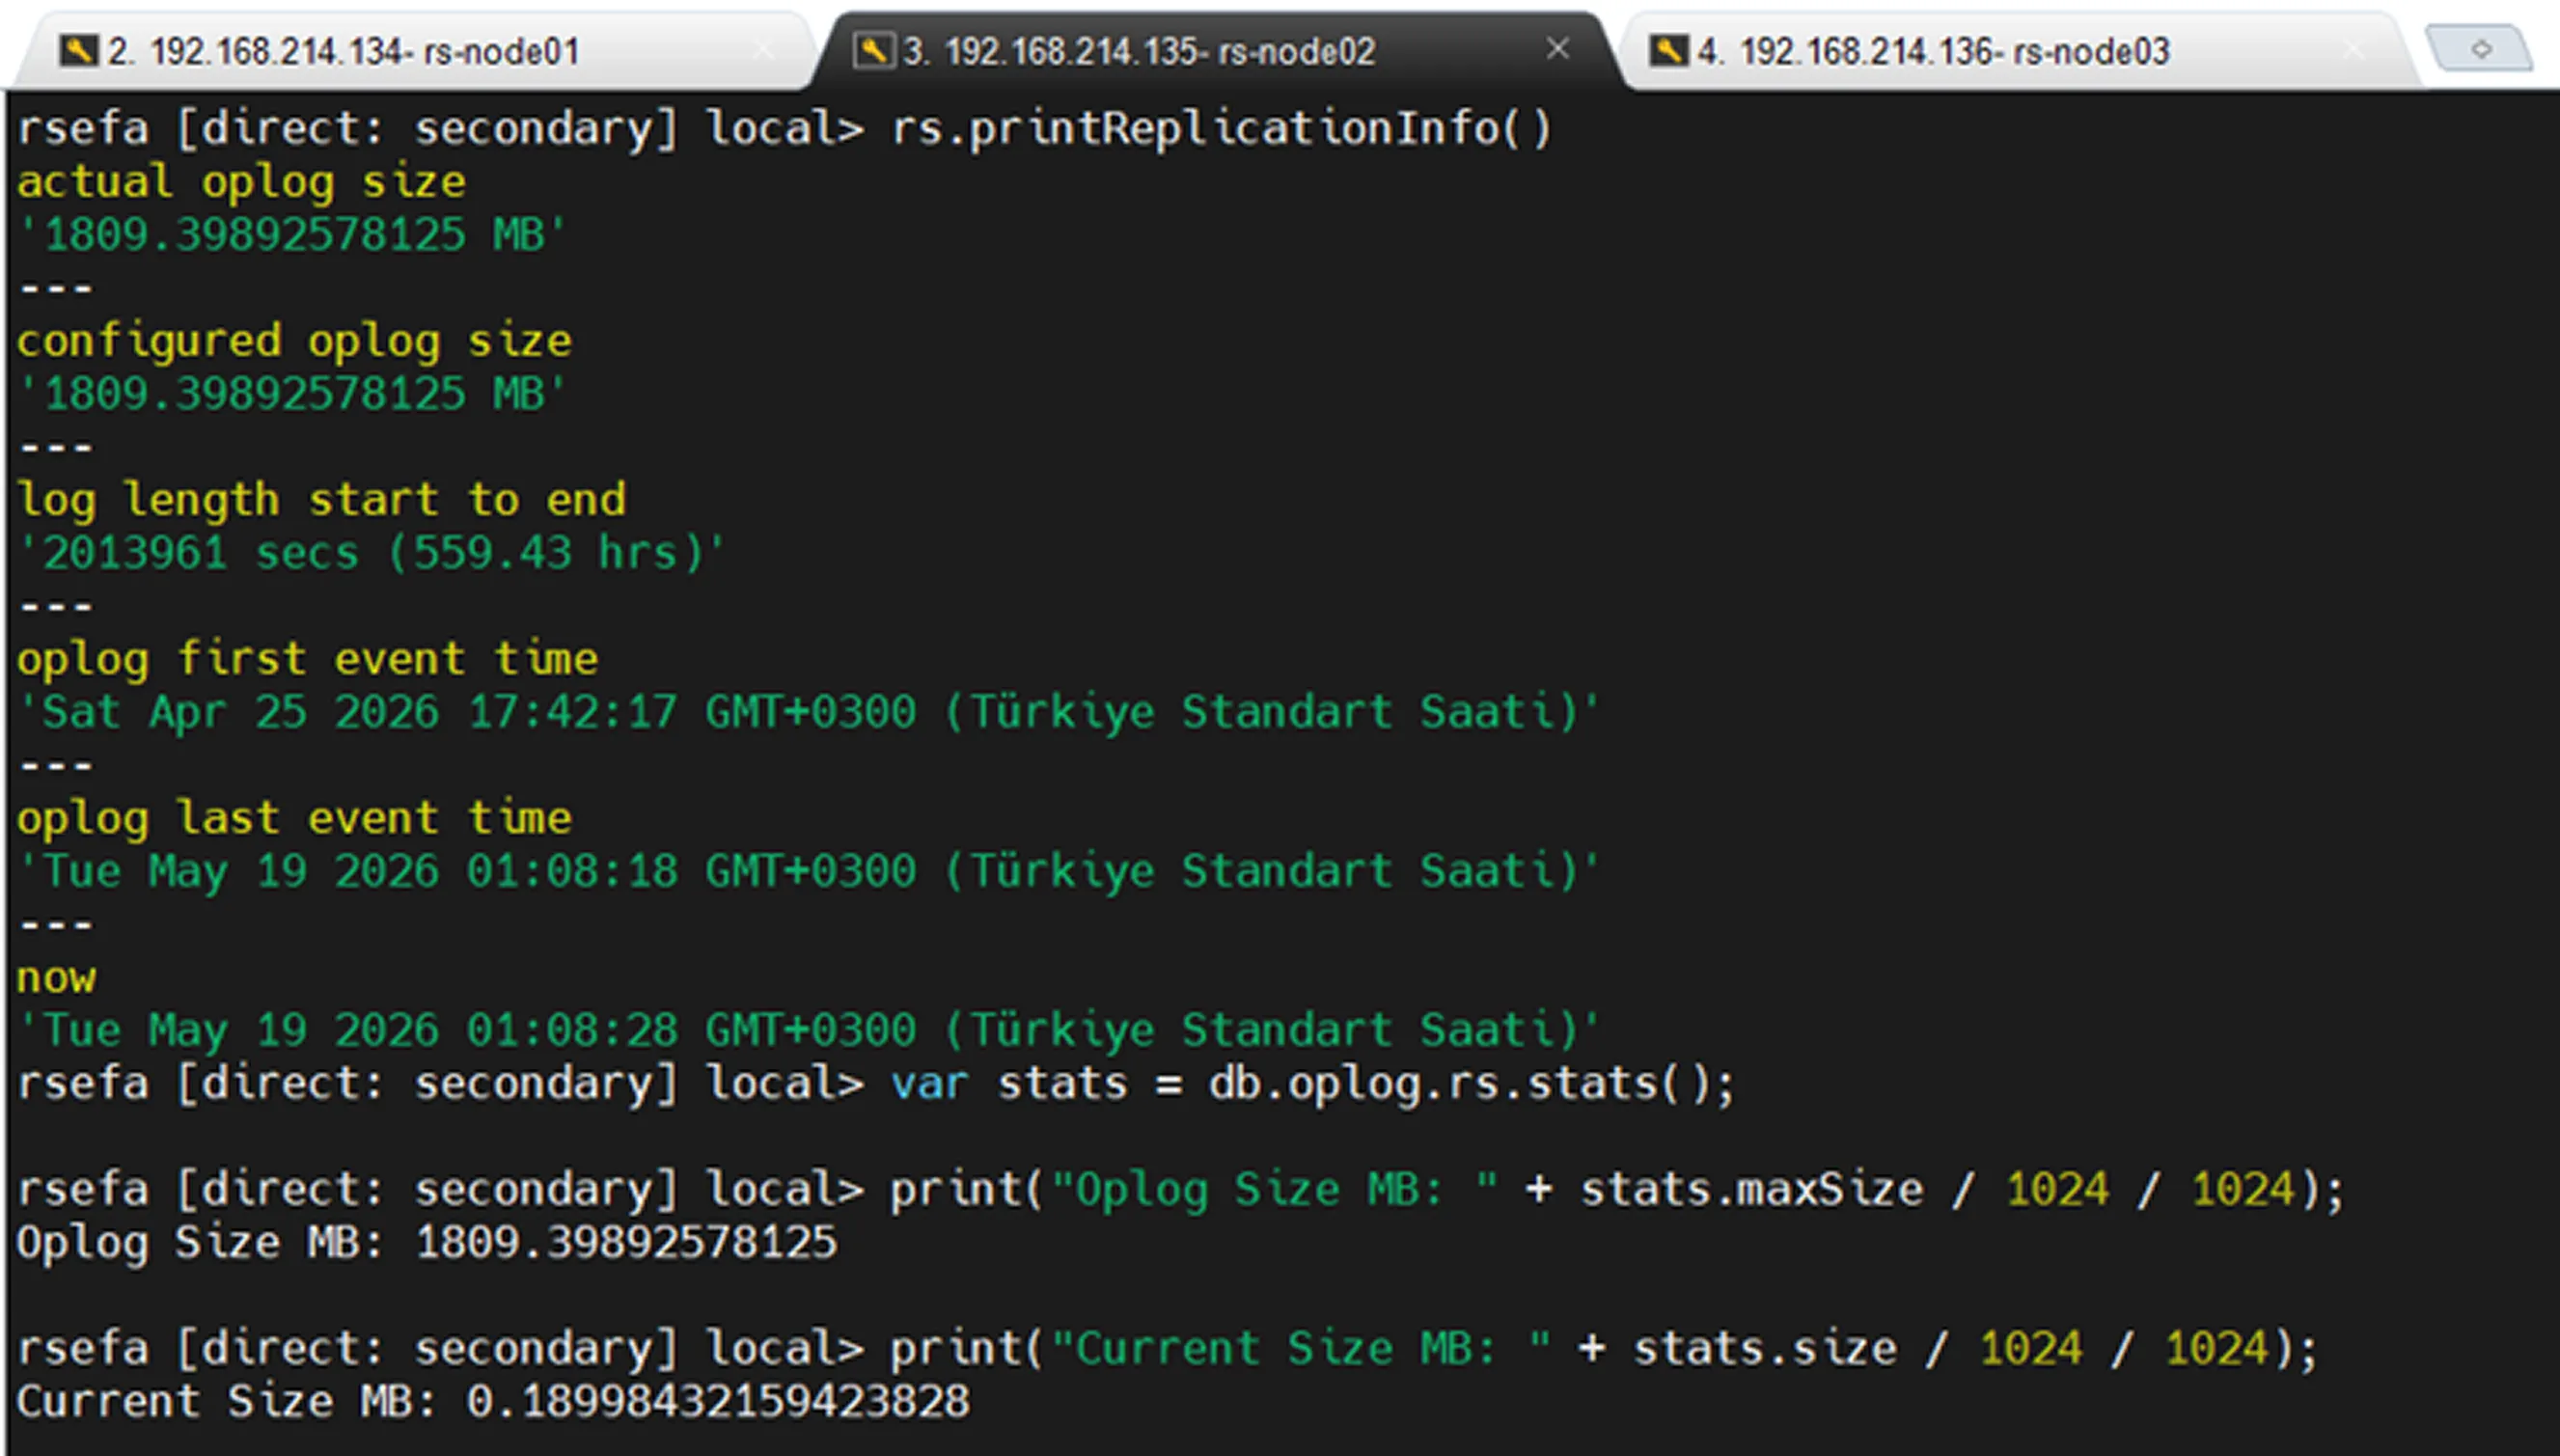
According to this output, the oplog retains approximately 23 days of history. If a Secondary node remains offline for more than 23 days, it may no longer be able to find the required historical oplog entries on the Primary when it comes back online. In this situation, the Secondary cannot catch up with the Primary through normal replication and will typically require a new initial sync.
If the Secondary node returns before the 23-day window expires, it can read the missing oplog entries from the Primary and synchronize itself without requiring a full resynchronization.
The output also indicates that approximately 1809 MB of space has been allocated for the oplog, while the current usage is approximately 0.18 MB.
Replication Lag Monitoring
To see how far Secondary nodes are behind the Primary within a Replica Set, use the following command:
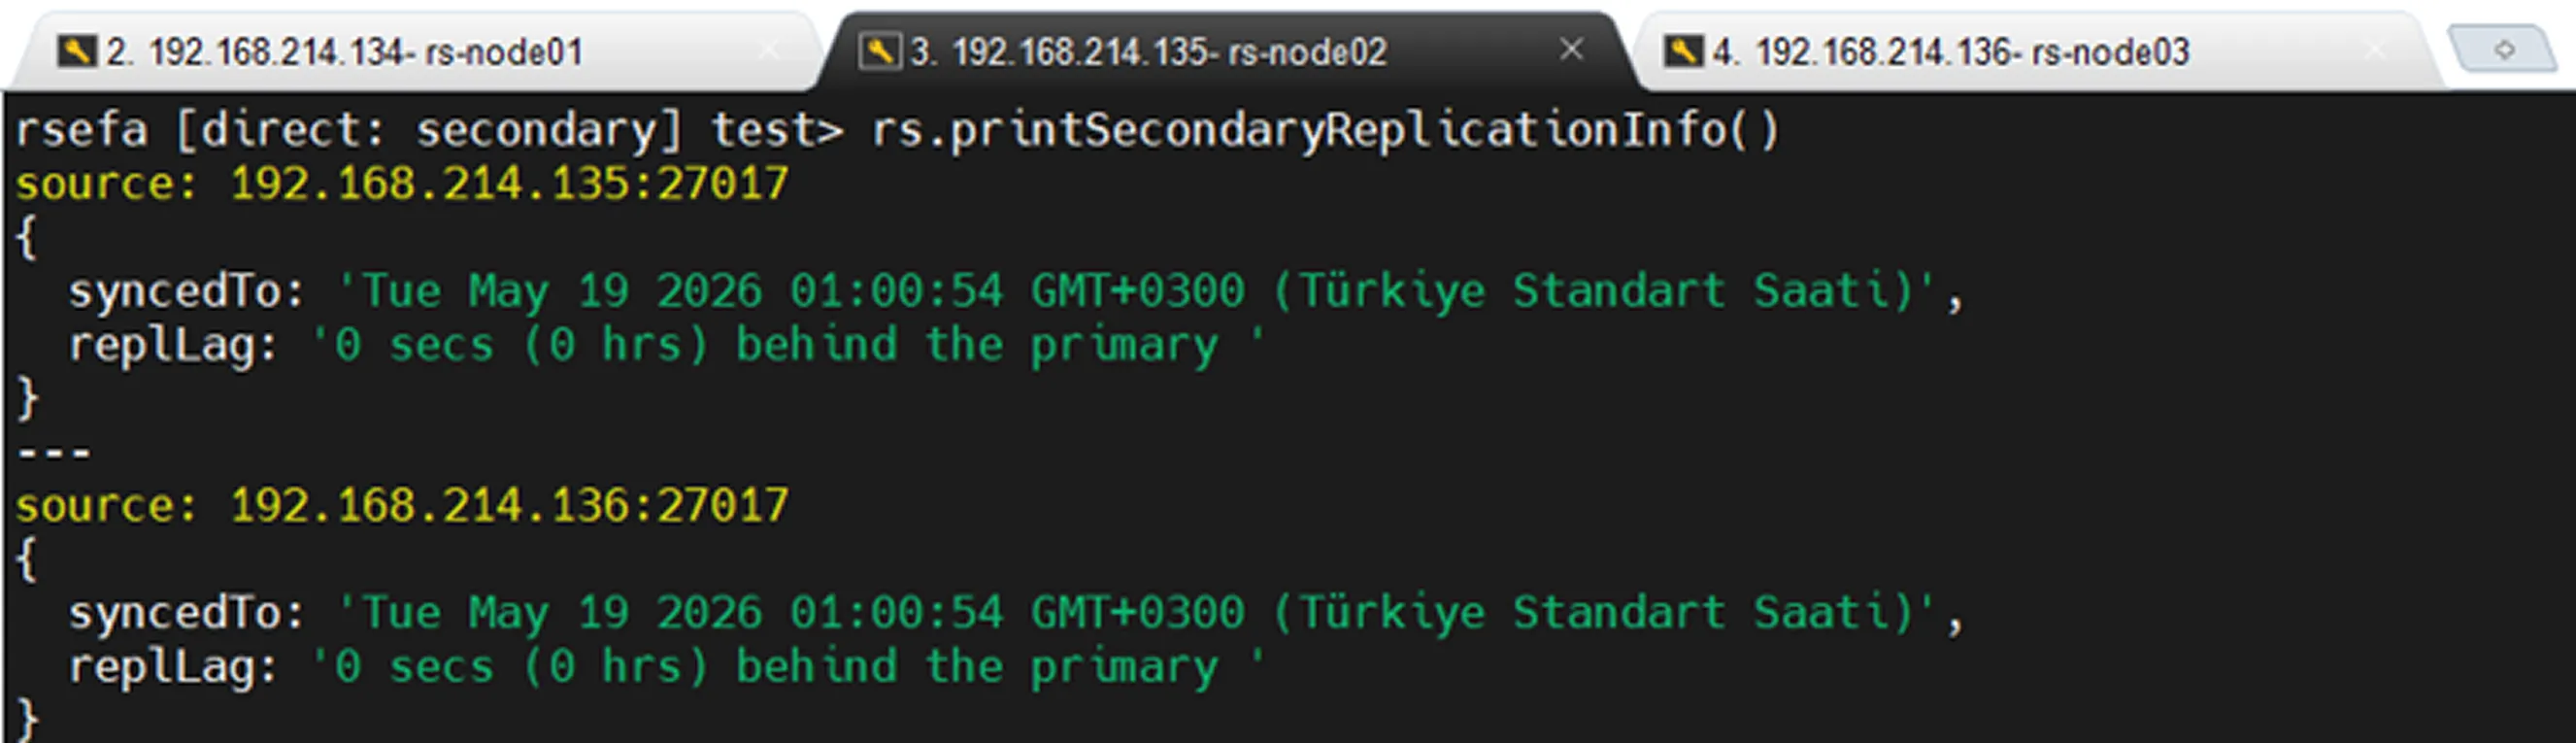
A high replication lag value indicates that the Secondary node is unable to apply changes from the Primary node in a timely manner and is experiencing replication delays.
Why Is Oplog Size Important?
If the oplog size is too small, older oplog records may be removed quickly in systems with heavy workloads. As a result, even a Secondary node that has been offline for a short period may be unable to catch up with the Primary when it comes back online.
For example, if the system is processing a large number of insert, update, or delete operations, the oplog can fill up rapidly. A Secondary node may have been offline for only two hours, but if the oplog retains only the most recent hour of changes, the Secondary will not be able to resume synchronization from where it left off.
Therefore, when determining oplog size, factors such as system workload, rate of data changes, and acceptable downtime must be carefully considered.
Oplog is not used on standalone MongoDB servers. Its purpose is to propagate data changes between members of a Replica Set.
Summary
The oplog can be thought of as the change history of a MongoDB Replica Set. Data modifications performed on the Primary node are written to the oplog. Secondary nodes continuously read these records and apply the same operations locally, ensuring that all Replica Set members remain synchronized.
Since the oplog is implemented as a capped collection, it has a fixed size. As the allocated space fills up, older records are automatically removed. For this reason, oplog size is critical for maintaining healthy and continuous replication.
In systems with heavy write activity, an undersized oplog can prevent Secondary nodes from catching up with the Primary even after short outages. In such situations, an initial sync may be required before the Secondary can rejoin the Replica Set in a healthy state.
In short, the oplog is a fundamental component of Replica Set replication. It records every change made on the Primary node, while Secondary nodes follow these records to stay up to date.
What Is an Arbiter?
An Arbiter is a special member of a MongoDB Replica Set that does not store data. Unlike a Secondary node, it does not apply oplog entries, maintain a copy of the data, or ever become a Primary.
Its primary purpose is to participate in elections by casting votes during Primary selection.
Arbiters are commonly used in environments that have two data-bearing nodes but lack sufficient disk space, CPU resources, or infrastructure to host a third data-bearing node.
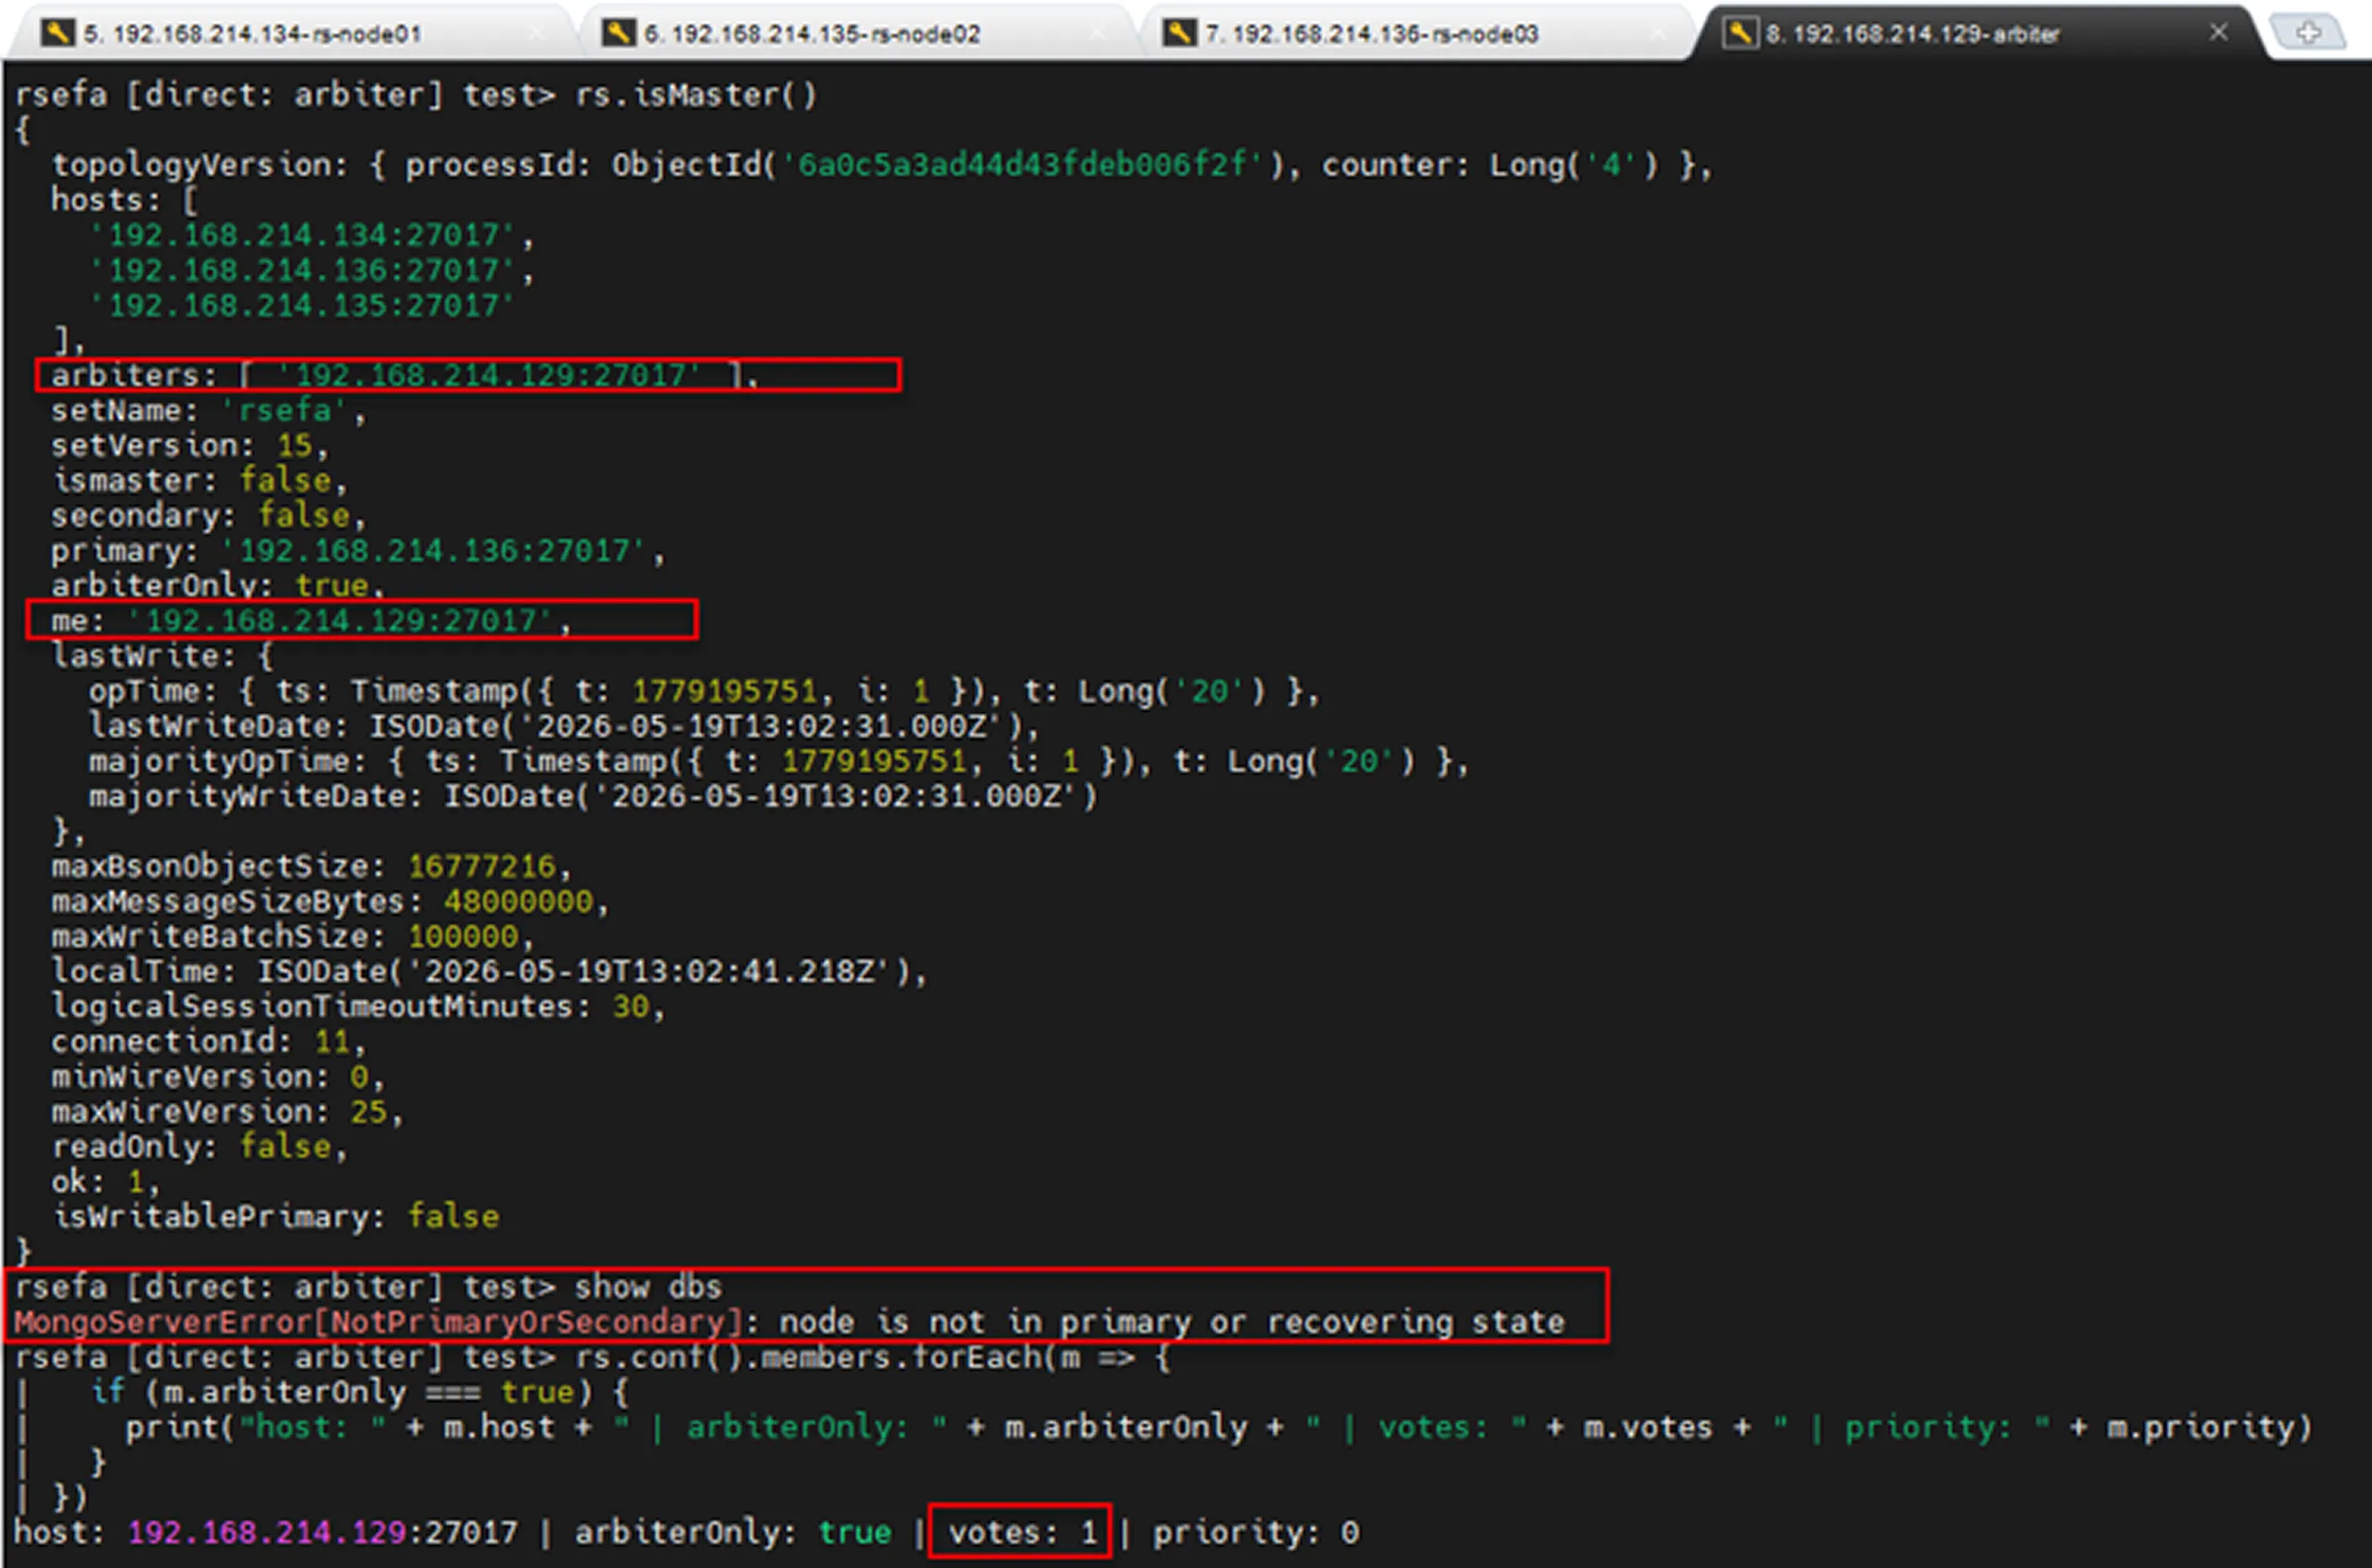
In the image above, we can see that the Replica Set contains an Arbiter. The Arbiter does not store data (show dbs), has voting rights, and can never become a Primary candidate during an election (priority: 0).
To verify this, use the following commands:
Majority
Majority is the minimum number of votes required, calculated based on the number of voting members.
The formula is:
Here, majority does not represent the number of healthy nodes in the cluster. Instead, it represents the minimum number of votes required to elect a Primary.
If the number of accessible voting members falls below the majority threshold, a new Primary cannot be elected and write operations will stop.
The mathematical function floor means rounding down to the nearest whole number.
Architecture Scenarios
Replica Set architectures can be designed differently depending on available resources and business requirements. The most commonly used architectures are PSS (1 Primary, 2 Secondary) and PSA (1 Primary, 1 Secondary, 1 Arbiter).
Other designs include PSSA, which is generally considered unnecessary, and a PSS architecture where one Secondary node is located in a disaster recovery site (DR site).
Let's examine the advantages and disadvantages of these architectures.
1. PSS (1 Primary, 2 Secondary)
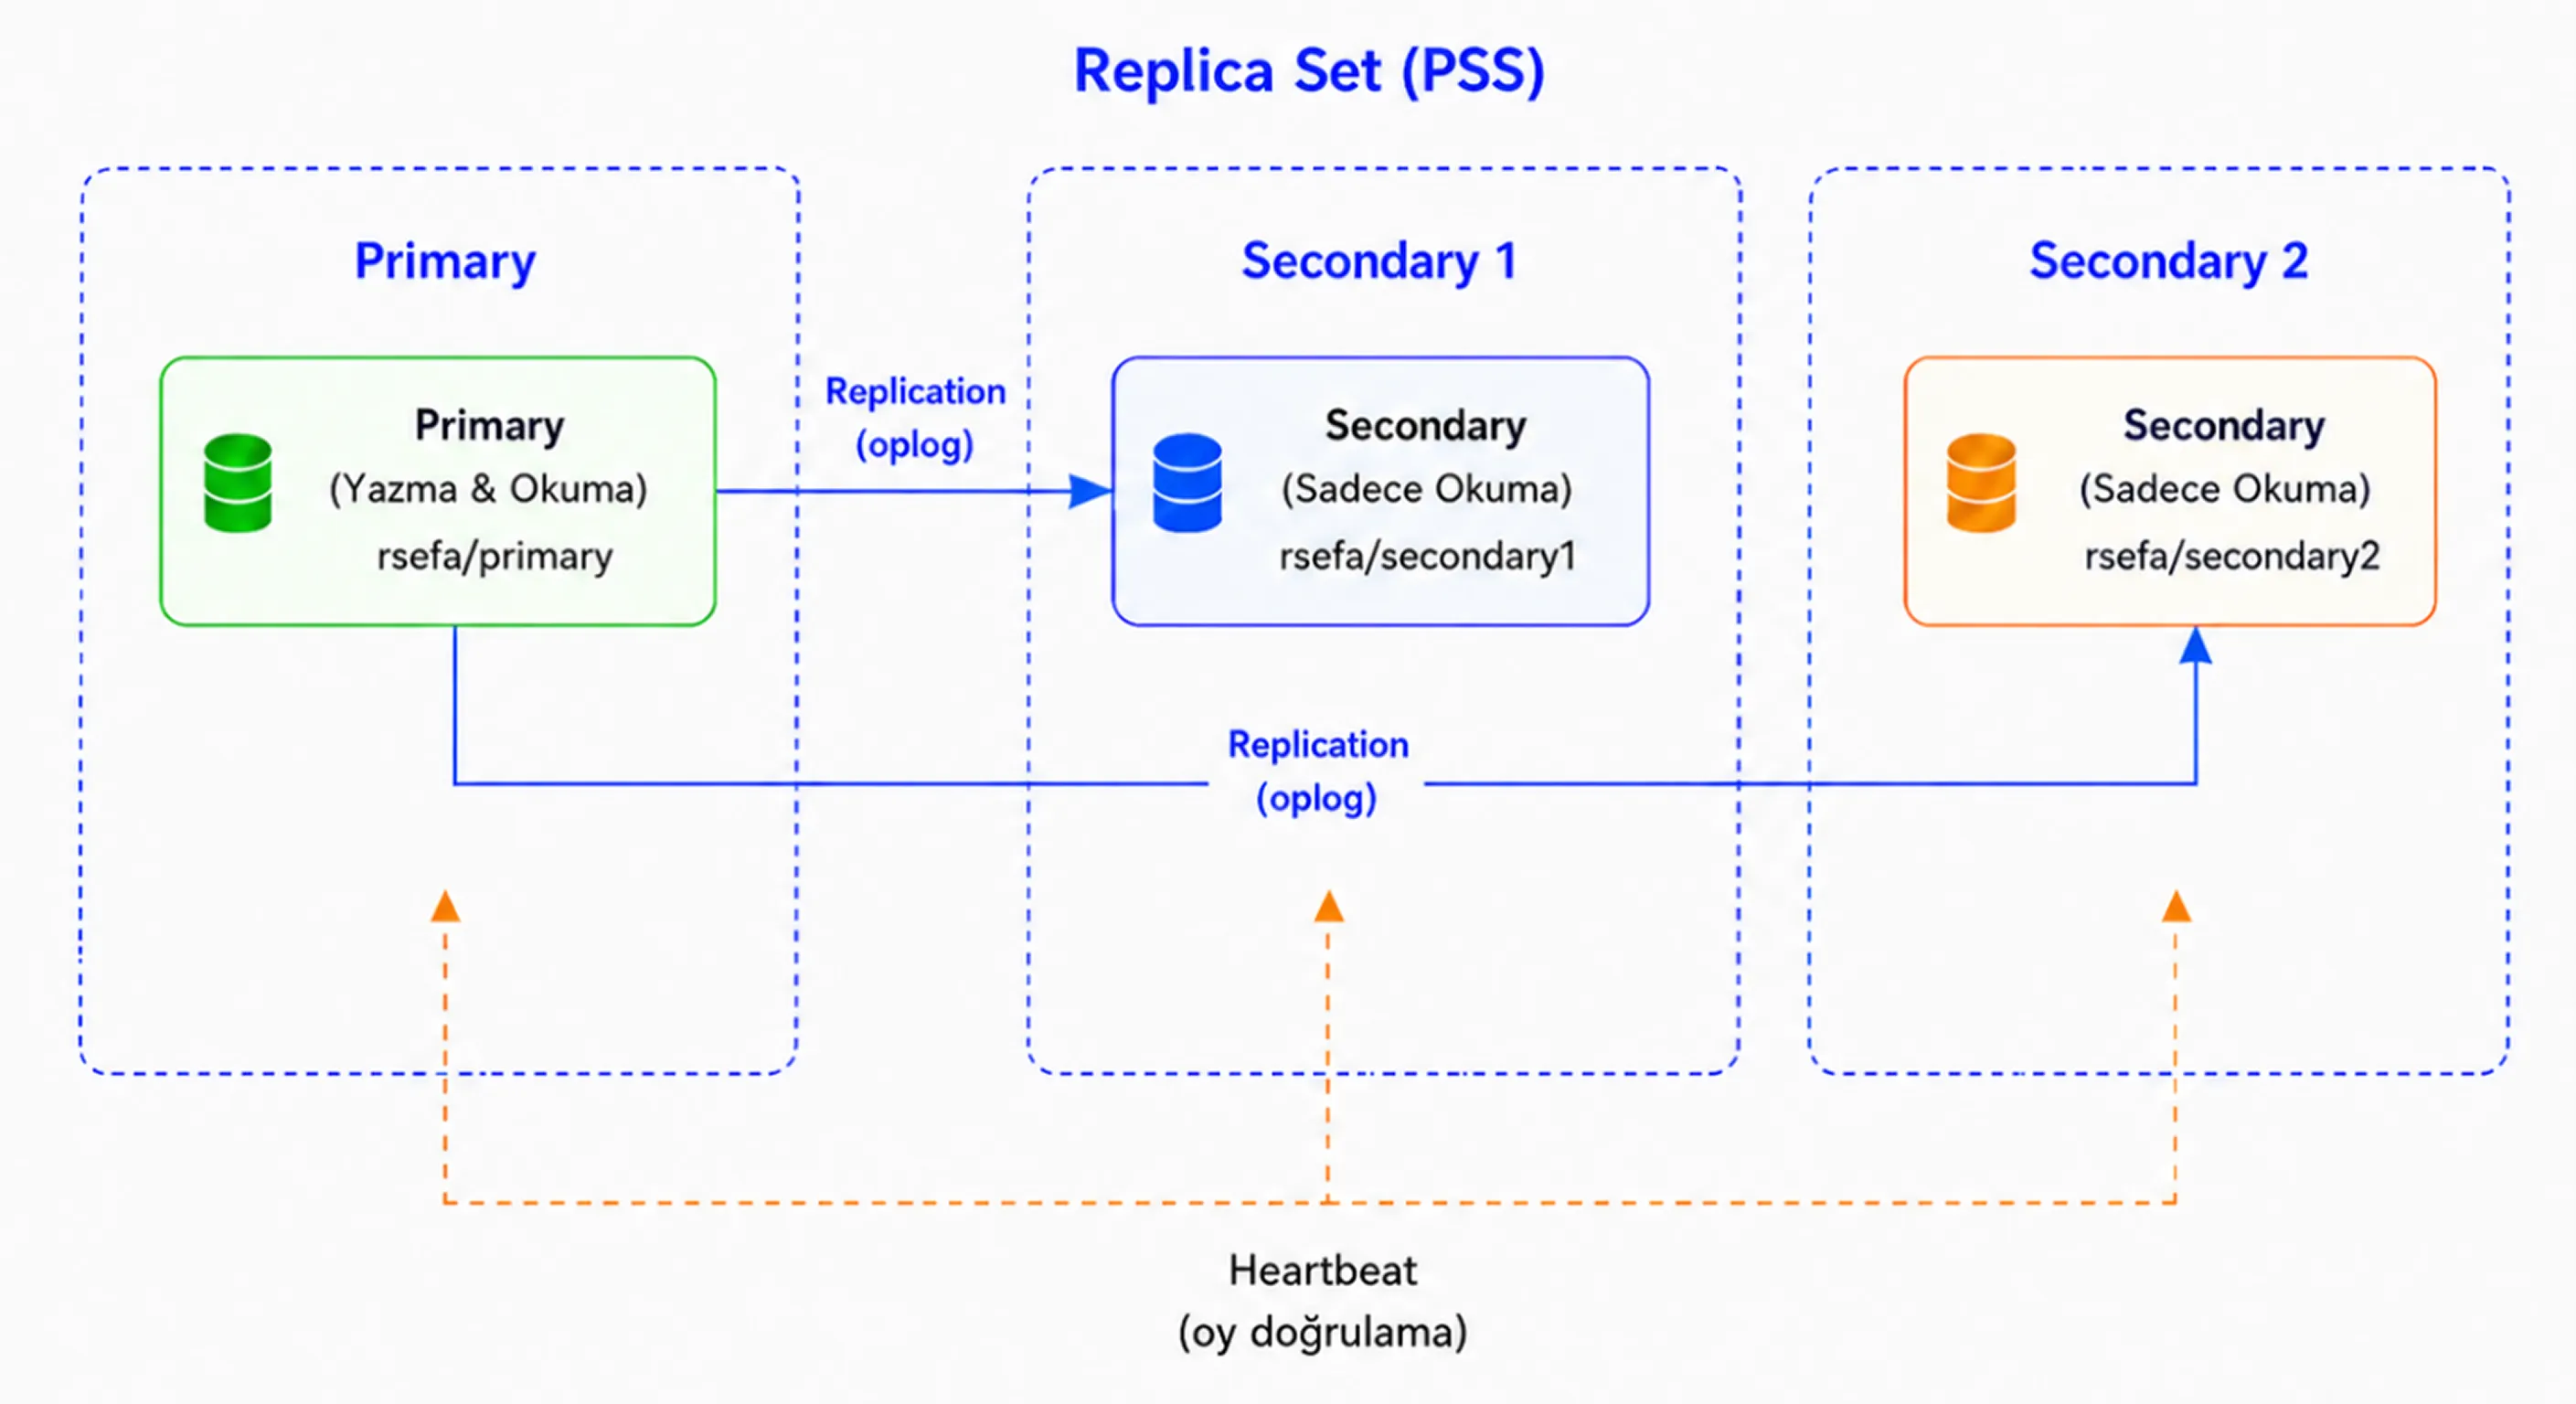
1. PSS (1 Primary, 2 Secondary)
In a PSS architecture, data is stored on all three nodes. The setup consists of one Primary node and two Secondary nodes.
If the Primary node experiences a failure or becomes unreachable, one of the eligible Secondary nodes is elected as the new Primary. As a result, the system can continue operating after a brief interruption.
Since there are three voting members in this architecture, the majority value is 2. This means that at least two voting members must be available for a Primary election to take place.
If the newly elected Primary also becomes unavailable, only one voting member remains. In this case, the majority requirement cannot be met, the remaining node cannot promote itself to Primary, and write operations stop.
2. PSS (1 Primary, 1 Secondary (DC), 1 Secondary (DRC))
This architecture provides a more secure design from both high-availability and disaster recovery perspectives. However, factors such as network latency, replication lag, and the possibility of the remote Secondary becoming the Primary must be carefully planned.
This is generally considered the most recommended architecture. Data is stored across all three nodes, while one of the Secondary servers is located in a different site, providing additional protection against site-level failures and making the data more resilient.
3. PSA (1 Primary, 1 Secondary, 1 Arbiter)
3. PSA (1 Primary, 1 Secondary, 1 Arbiter)
If resources are insufficient to deploy a second Secondary node but a Replica Set architecture is still required, a PSA design can be used. This architecture consists of one Primary node, one Secondary node, and one Arbiter node.
In this design, the Arbiter does not store data, does not apply oplog entries, and can never become the Primary. Its only purpose is to participate in elections by casting votes.
When the Primary node becomes unavailable, the Secondary node can be elected as the new Primary. However, in this scenario, only the new Primary and the Arbiter remain, meaning that there is only one data-bearing node left. As a result, although the system continues to operate, replication redundancy is temporarily lost.
In a scenario where only the Primary and Arbiter remain, if the Arbiter also becomes unavailable, the majority is lost. In this case, the current Primary can no longer maintain its Primary role, and write operations stop.
Similarly, if the Primary goes down and only the Arbiter remains online, the cluster cannot continue processing write operations because the Arbiter neither stores data nor can become the Primary.
In summary, the PSA architecture can be used in resource-constrained environments, but it does not provide the same level of data redundancy as a PSS architecture. Whenever possible, PSS should be preferred, while PSA should be considered only in scenarios with resource or budget limitations.
4. PSSA (1 Primary, 2 Secondary, 1 Arbiter)
A PSSA architecture consists of one Primary node, two Secondary nodes, and one Arbiter node.
At first glance, adding an Arbiter to a PSS architecture may appear to provide additional safety. However, this is not always the case. In this design, there are four voting members, which results in a majority value of three.
As a result, if any two members become unavailable, the majority is lost. Without a majority, a new Primary cannot be elected, or the current Primary can no longer maintain its role. Consequently, write operations stop.
For this reason, using an additional Arbiter is generally less desirable than using a standard PSS architecture. In a PSS setup, data is stored on three nodes and a majority can be maintained without requiring an Arbiter.
Rather than being kept as a permanently active cluster member, an Arbiter can be planned as a standby component that can be quickly introduced during exceptional situations. For example, it may be temporarily added to the cluster when a node fails. However, such operations should be performed carefully and the Replica Set configuration should be updated in a controlled manner.
In summary, the PSSA architecture typically provides no significant advantage over PSS. In fact, by increasing the number of voting members, it raises the majority requirement and can cause the cluster to stop processing write operations in certain failure scenarios.
Replica Set Commands
Some commonly used Replica Set management commands are listed below.
rs.status()
Displays the current status of Replica Set members. Information such as whether nodes are Primary, Secondary, or Arbiter, along with health status, replication status, and election details, can be viewed with this command.
rs.isMaster()
Provides information about the role of the connected MongoDB node within the Replica Set. It can be used to determine whether the node is a Primary, its Secondary status, and connection details.
Note: In newer MongoDB versions, the hello command is preferred over rs.isMaster().
rs.conf()
Displays the Replica Set configuration. Settings such as host, priority, votes, and arbiterOnly can be reviewed using this command.
rs.initiate()
Used to initialize a new Replica Set. It is executed when creating a Replica Set for the first time.
rs.add()
Used to add a new data-bearing member to the Replica Set, typically a new Secondary node.
rs.addArb()
Used to add a new Arbiter node to the Replica Set. An Arbiter does not store data and only participates in elections.
rs.remove()
Removes a member from the Replica Set. The member can be either a Secondary node or an Arbiter.
rs.reconfig()
Applies changes made to the Replica Set configuration. It is commonly used when modifying settings such as priority, votes, hidden, or arbiterOnly.
rs.stepDown()
Forces the current Primary node to step down from its Primary role. Afterward, an eligible Secondary node may be elected as the new Primary.
rs.freeze()
Prevents the connected Secondary node from becoming a Primary candidate for a specified period of time. It is often used during maintenance or controlled failover operations.
rs.printReplicationInfo()
Displays oplog size, oplog start/end times, and oplog window information. It is commonly used to determine how much historical oplog data is available.
rs.printSecondaryReplicationInfo()
Displays replication lag information for Secondary nodes relative to the Primary. It is useful for monitoring how far behind Secondary nodes are.
rs.syncFrom("IP:PORT")
Manually specifies the member from which a Secondary node should synchronize. This command should be used with caution, as MongoDB normally manages sync source selection automatically.
Installation Steps
1. Install MongoDB on All Servers
2. Disable Firewall and SELinux on All Servers
Verification:
Verification:
3. Configure Replica Set on All Servers
4. Initialize the Replica Set
After connecting to mongosh on any server, initialize the Replica Set:
Post-Installation Tests
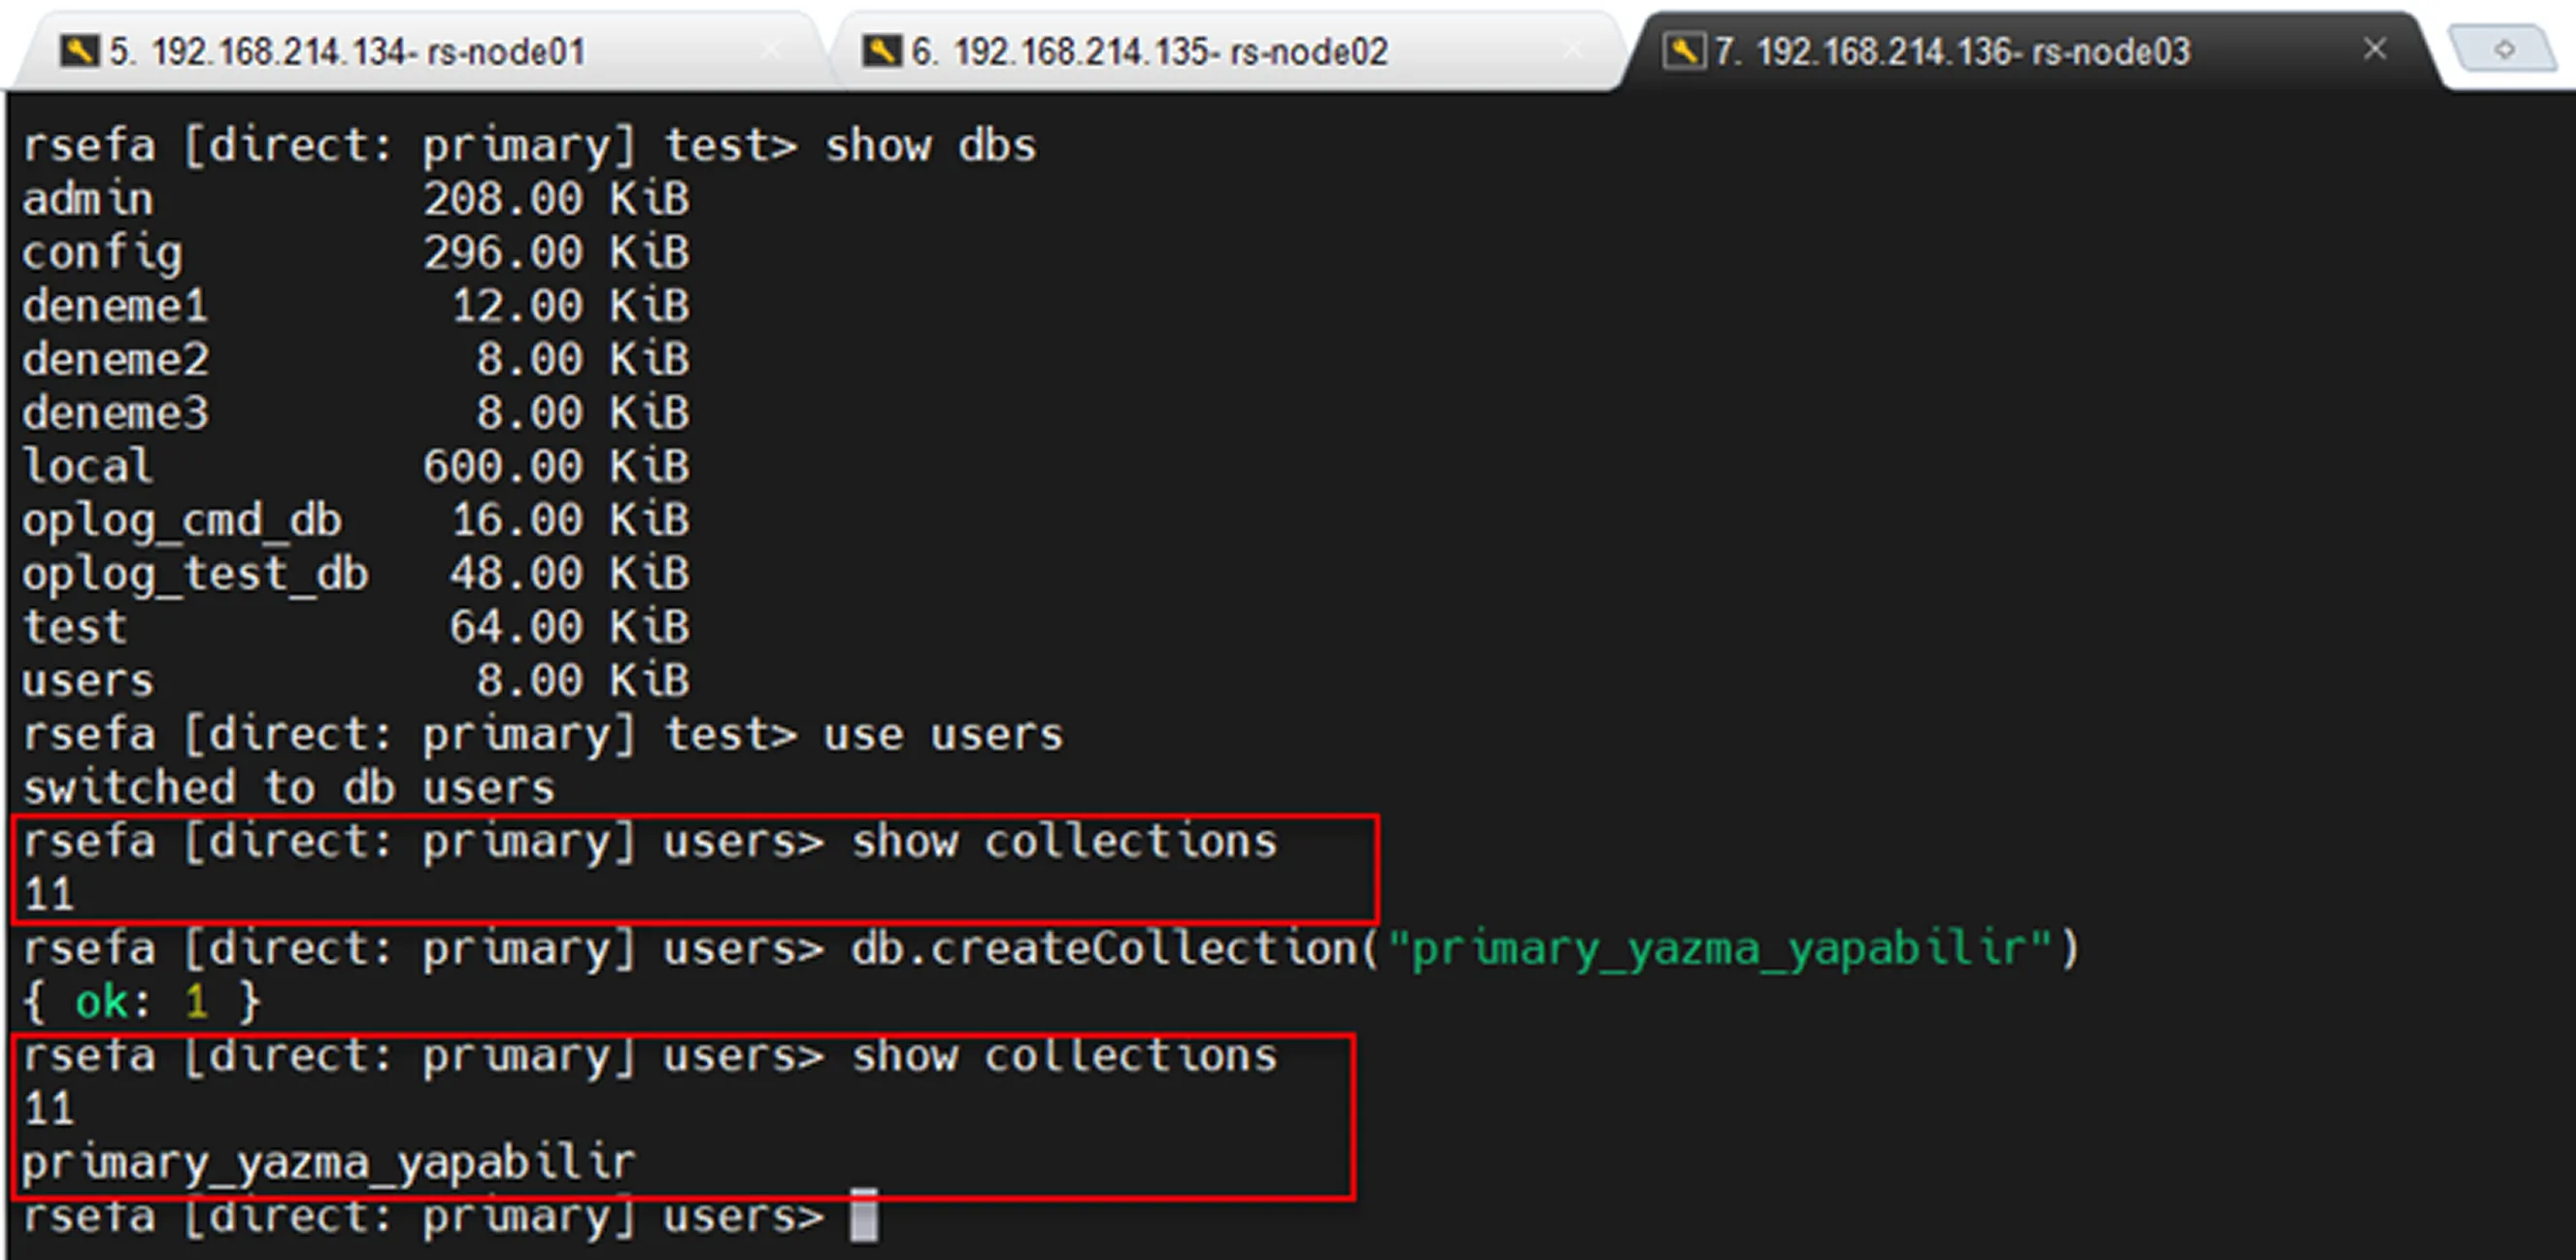
Primary Read/Write Test
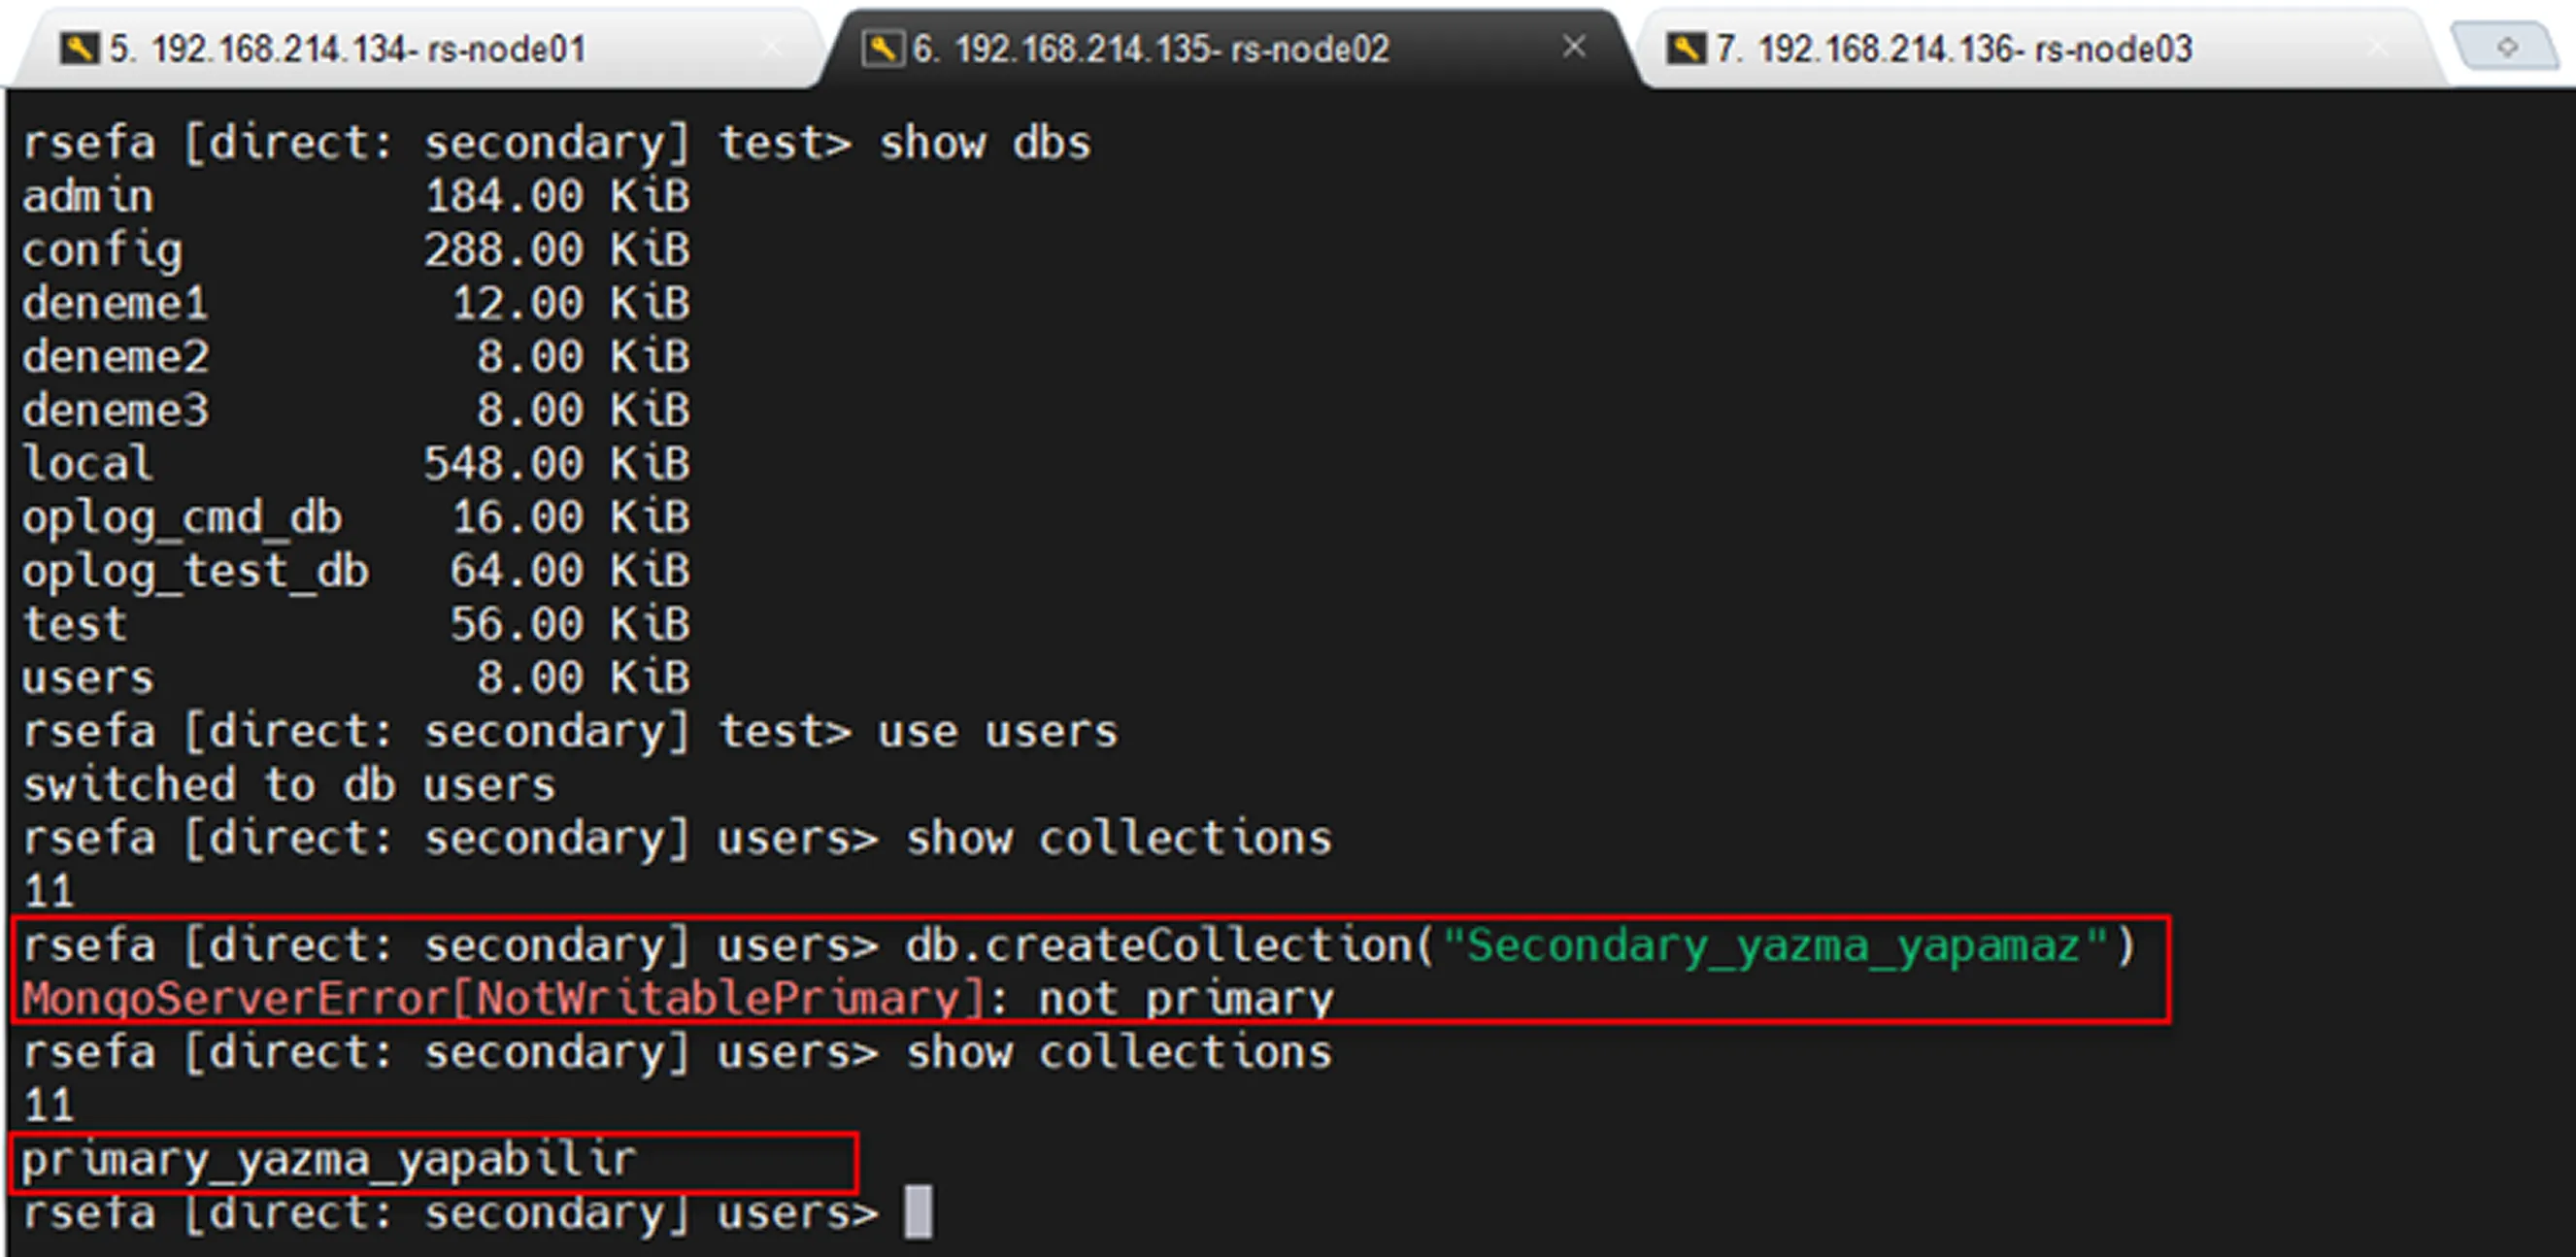
Secondary read only and replication test
Automatic Failover Test
When the mongod service is stopped on the Primary server, one of the Secondary servers is automatically promoted to Primary (provided that a majority is available). However, this process causes a brief interruption while the election takes place.
If there is no disaster scenario and leadership needs to be transferred in a controlled manner with minimal disruption, performing a manual failover is generally recommended.
Manual Failover Test
Manual failover can be performed in two different ways.
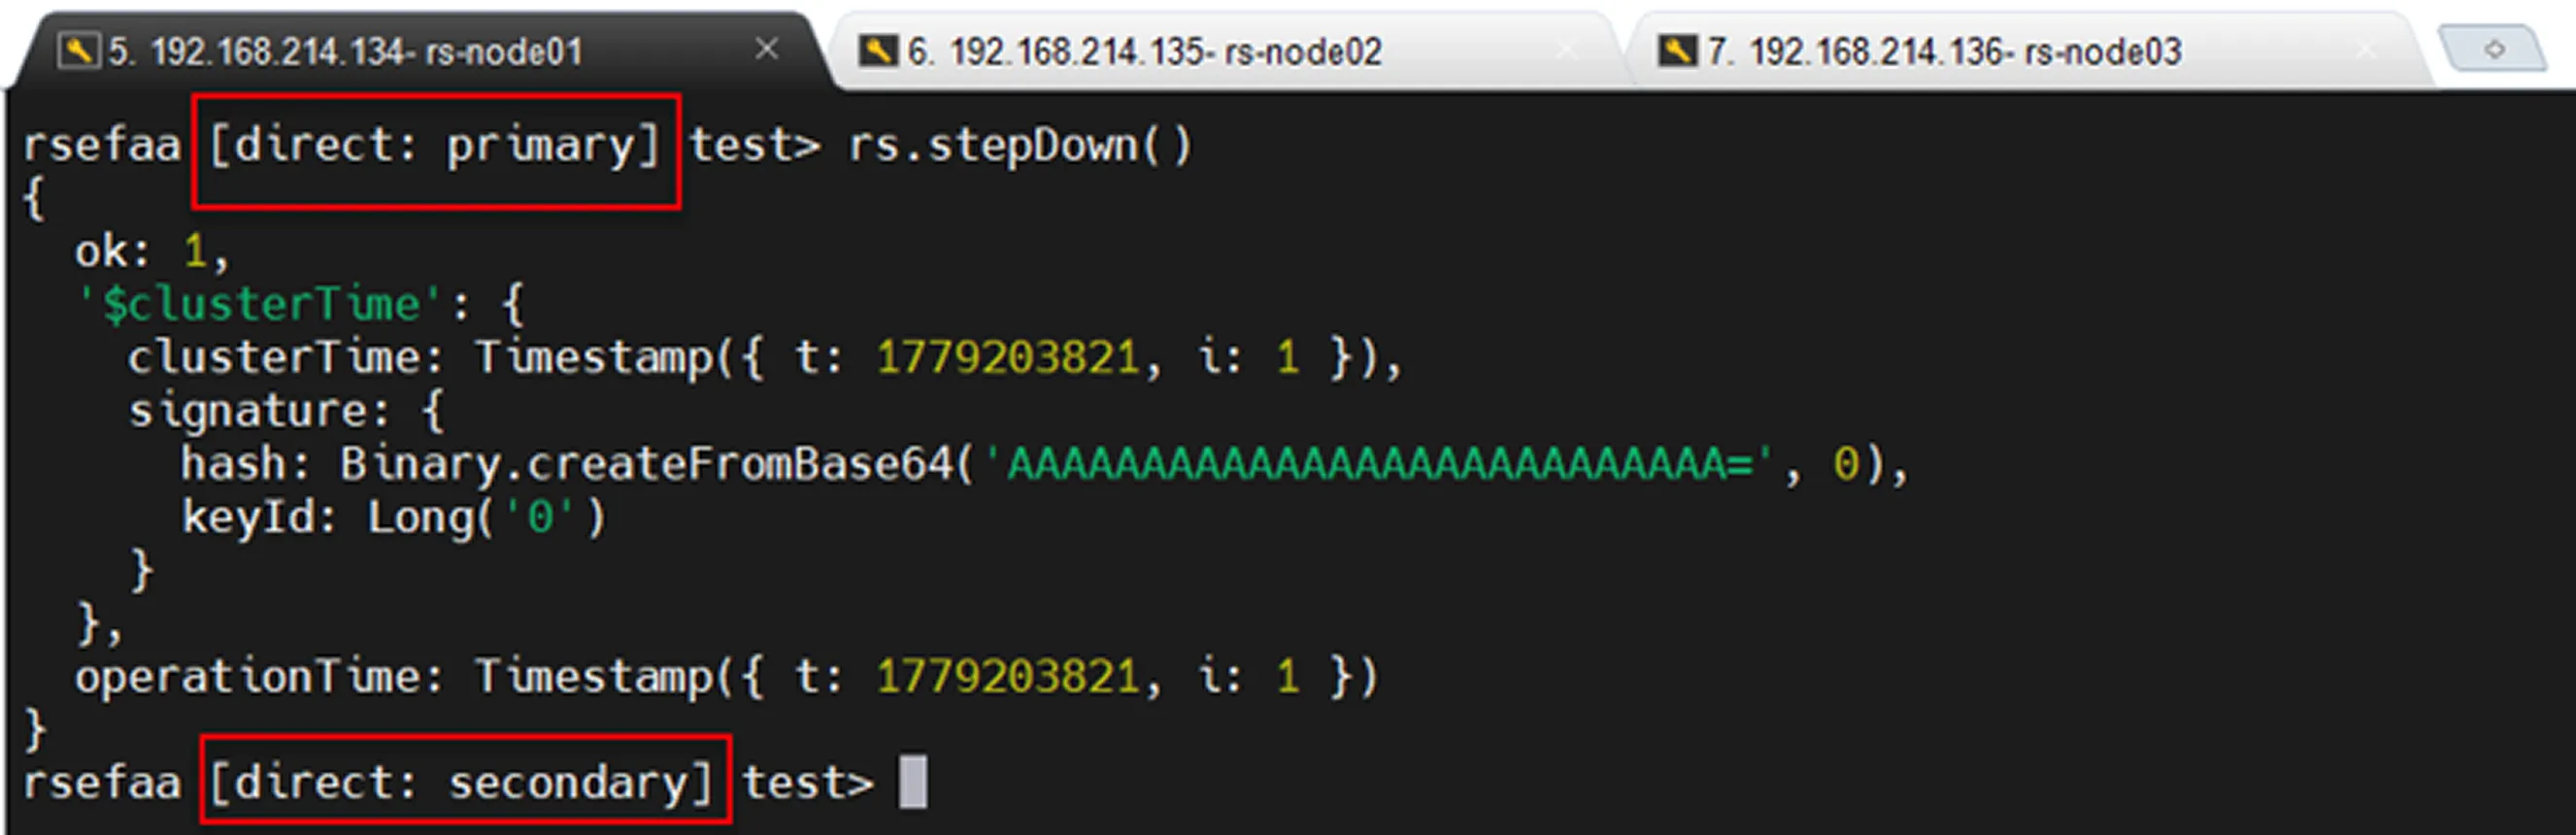
The first method is to connect to the Primary server and execute the following command:
This causes the current Primary to relinquish its leadership role. An election is then initiated among the available Secondary nodes, and a new Primary is selected.
In the second method, the priority values of the servers are updated. The server with the highest priority value can be considered the one most likely to become the Primary.
Priority values can be defined during the initial setup or modified later. During the installation process, we specified these values using the priority parameter.
1= Default2= Prefers to become Primary0= Should not become Primary unless absolutely necessary (recommended for disaster recovery site servers)
If priority values were not configured during installation, the following steps can be performed on the Primary server:
Load Balancing
The general approach for a Replica Set is to allow the application to connect directly to the Replica Set through the MongoDB driver.
The recommended connection format is:
In this configuration, the driver automatically detects the Primary node, redirects traffic to the new Primary after a failover, and can distribute read traffic according to the configured read preference settings.
For this reason, placing a traditional TCP load balancer in front of a Replica Set is usually unnecessary. In some cases, an incorrectly configured load balancer may even attempt to send write operations to a Secondary node, resulting in errors.
However, solutions such as HAProxy may be useful in certain special scenarios:
The application supports only a single host definition.
The application does not support Replica Set connection strings.
Centralized connection management is required.
The recommended architecture for Replica Sets is:
In other words, forcing users or applications to connect directly to a specific Primary IP address is not a good practice because the Primary can change at any time. Applications should always use a Replica Set connection string.
Correct connection:
Incorrect or risky connection:
If mongo1 is not the Primary or later becomes a Secondary, the application may encounter write failures.
Adding and Removing Nodes
Before adding a new node to a Replica Set, the data directory of the node should be cleaned.
If the data directory is not cleaned, replication data may be synchronized on top of existing local data, which can lead to inconsistencies within the cluster.
The command above removes a node from the Replica Set.
Of course, MongoDB does not allow a node to remove itself from the Replica Set. 😊
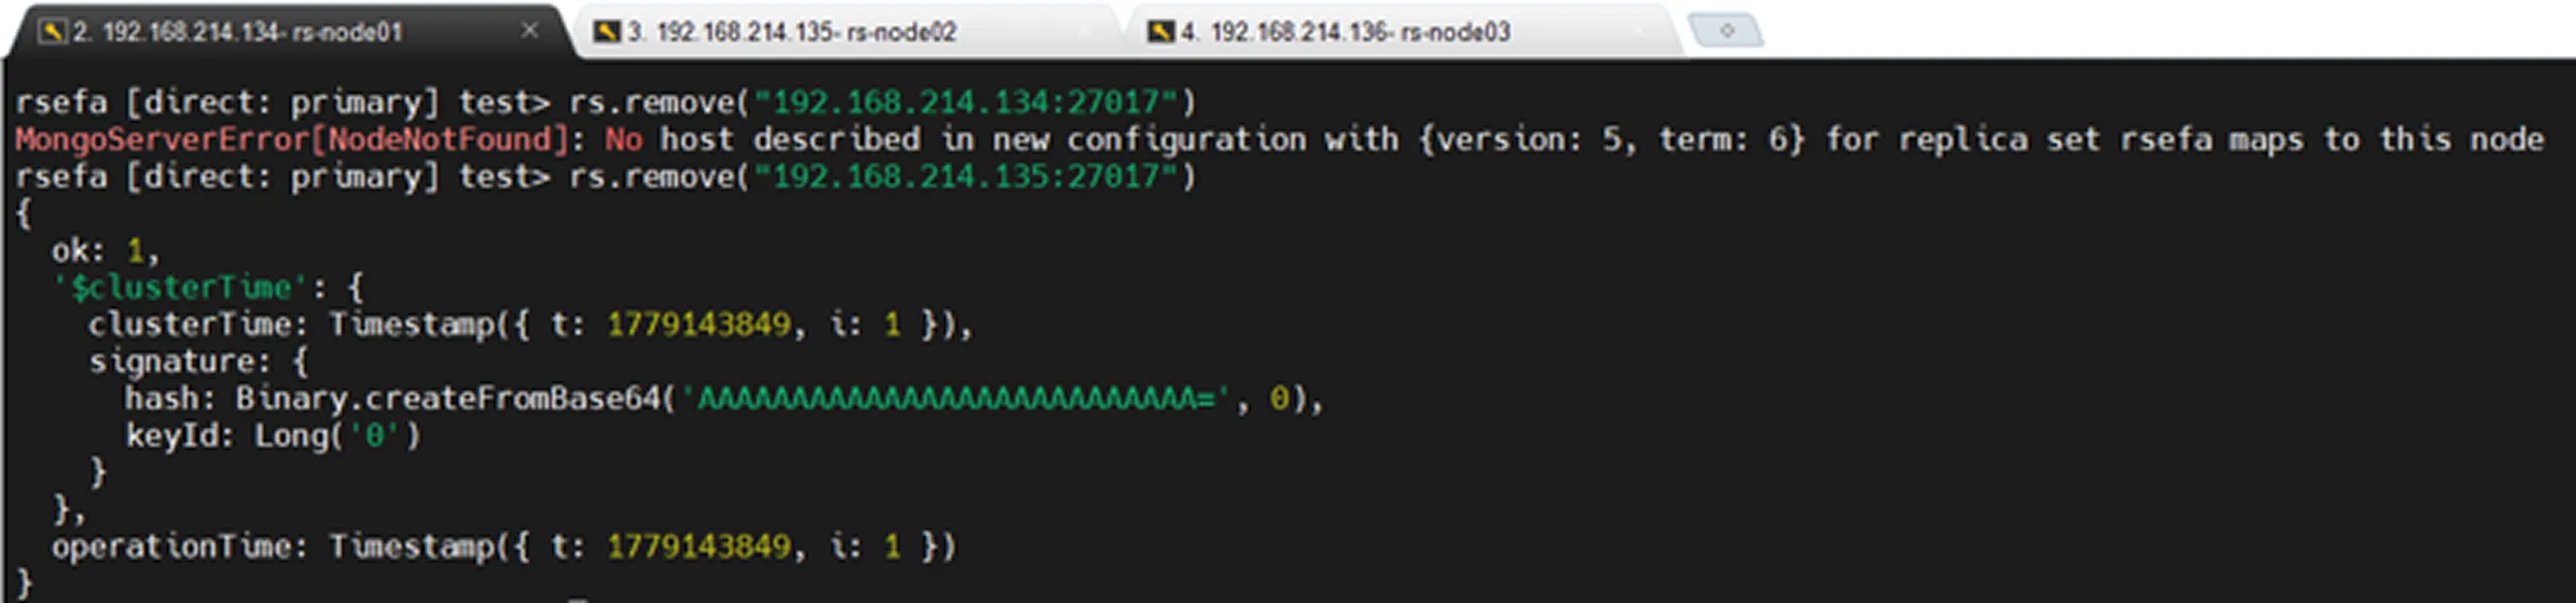
Before and after the removal operation, by checking the db.hello() command, we can confirm that the node has been successfully removed from the Replica Set.
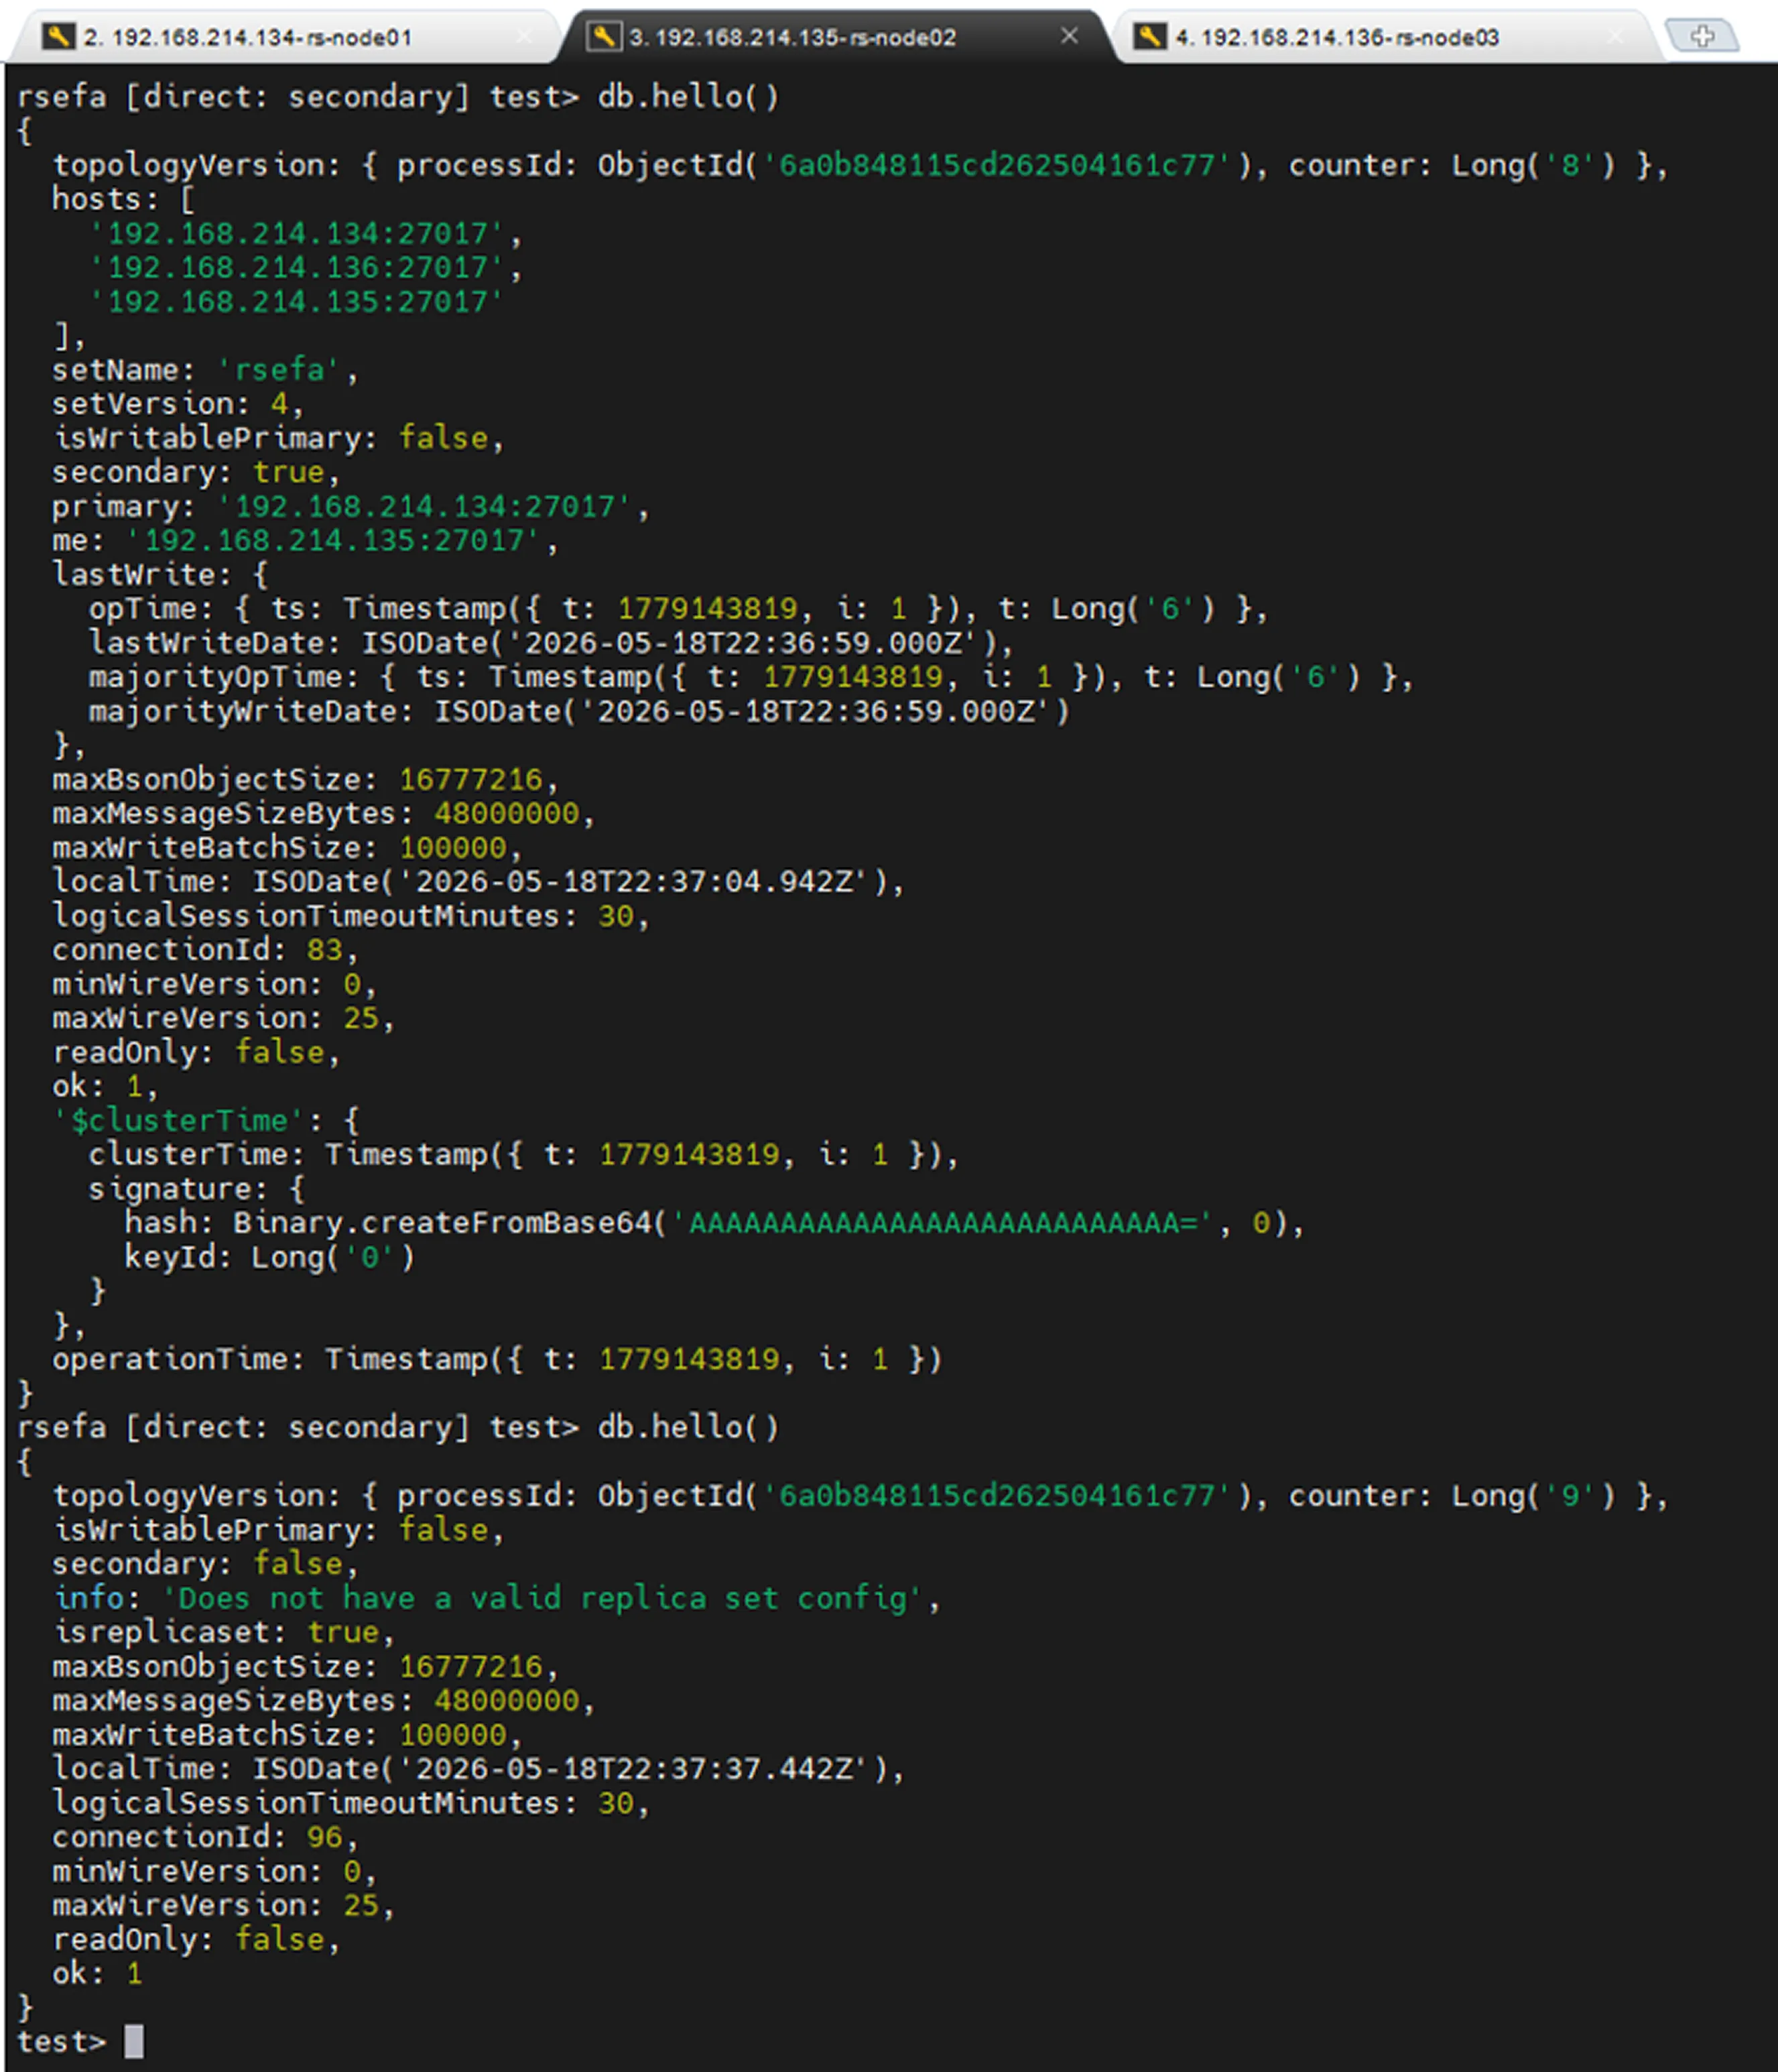
Before adding a new node, the data directory is cleaned to ensure cluster consistency. The node is then added again in a clean state.
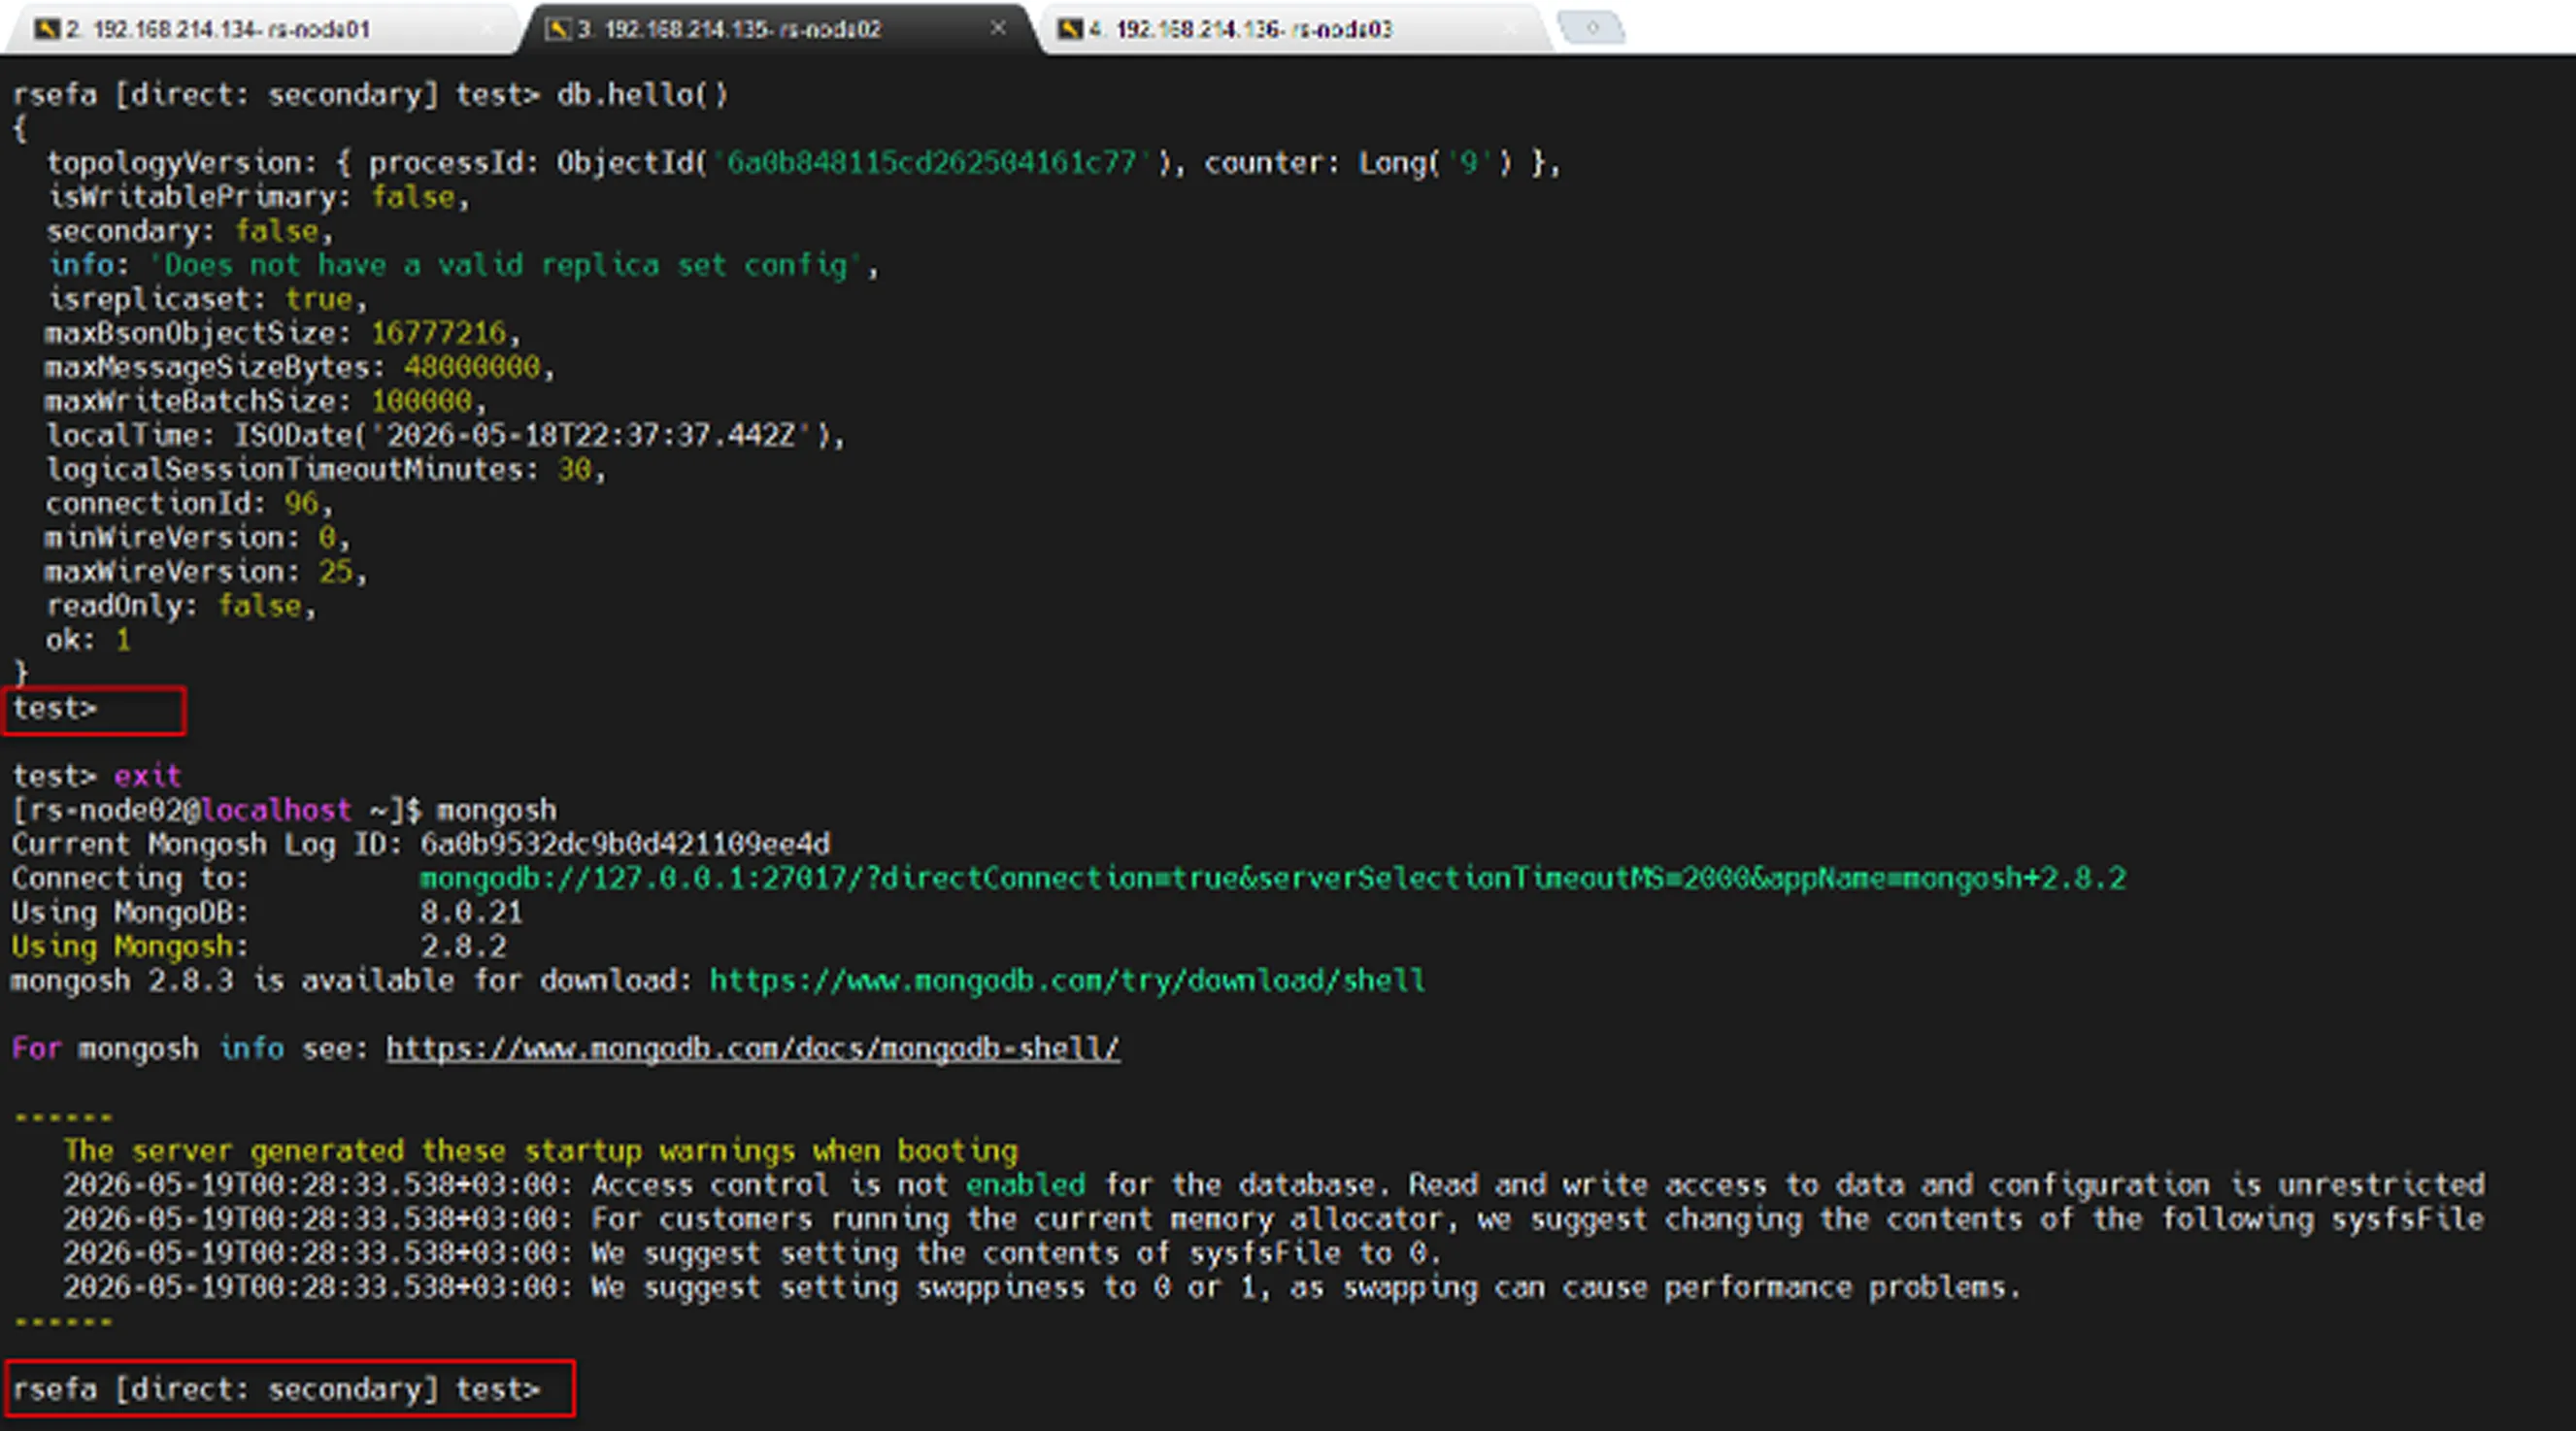
As shown in the image above, the node that was removed from the Replica Set has been successfully added back to the Replica Set.


